The hardware is validated. The single-node proof of concept worked. Three identical Dell OptiPlex 5090 SFF machines are racked, cabled, and ready. Time to deploy the production cluster.
This post covers the 3-node OKD 4.20 compact cluster installation — the real one, not a validation throwaway. It took three attempts across two days. Every failure traced back to something that existed before the installer even ran.
What changed from SNO
The SNO validation used platform: none on home.lab — a disposable test cluster on an internal-only domain. The 3-node deployment changes three fundamental things:
| SNO (Stage 0) | 3-Node (Stage 1) | |
|---|---|---|
| Platform | platform: none | platform: baremetal |
| Domain | home.lab | sudops.pl (real public domain) |
| API/Ingress | Bound to node IP (192.168.1.7) | Floating VIPs via keepalived |
| Nodes | 1 (combined everything) | 3 (compact: control-plane + worker) |
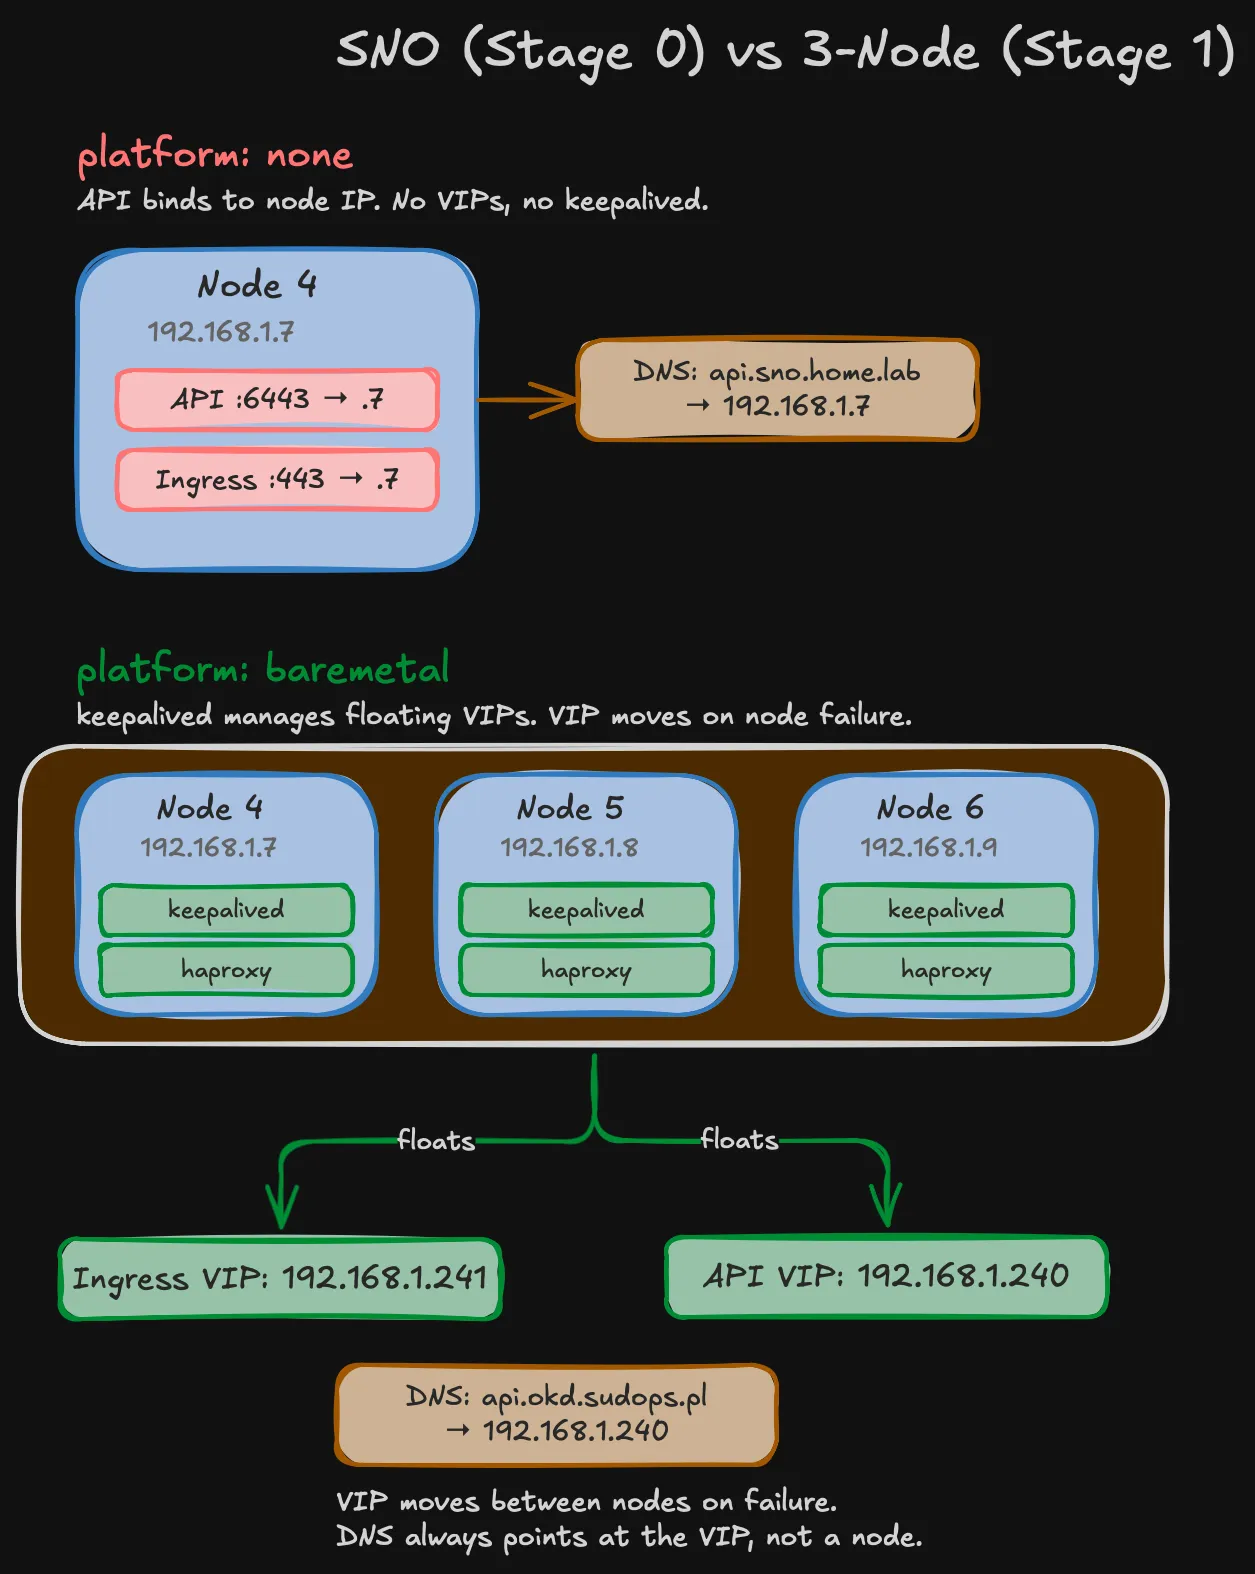
platform: baremetal is mandatory for multi-node agent-based installs in OKD 4.17+. The installer rejects platform: none with more than one control plane replica. The good news: this doesn’t require BMC, IPMI, or Ironic. With the agent-based installer, you boot nodes manually from an ISO — platform: baremetal just means OKD deploys keepalived and haproxy static pods on every control plane node for VIP management.
Using sudops.pl instead of home.lab enables cert-manager with DNS-01 validation via Cloudflare API later. Browser-trusted wildcard certs for *.apps.okd.sudops.pl without managing a private CA. The split-horizon DNS is simple: Pi-hole forwards only *.okd.sudops.pl to the MikroTik router via a targeted dnsmasq directive, everything else goes to upstream DNS normally.
Warning (VIPs must live on VLAN 5)
The original design placed API and Ingress VIPs on VLAN 40 (DMZ) at 192.168.40.253 and .254. This doesn’t work — keepalived binds VIPs to the interface whose subnet matches the VIP address. Since nodes’ primary interfaces are on 192.168.1.0/24 (VLAN 5), VIPs must also be on this subnet. The DMZ exposure plan is now DNAT rules on the MikroTik router.
The install-config.yaml
apiVersion: v1baseDomain: sudops.plmetadata: name: okdcompute: - architecture: amd64 hyperthreading: Enabled name: worker replicas: 0 # Compact: masters are schedulablecontrolPlane: architecture: amd64 hyperthreading: Enabled name: master replicas: 3networking: clusterNetwork: - cidr: 10.128.0.0/14 hostPrefix: 23 machineNetwork: - cidr: 192.168.1.0/24 networkType: OVNKubernetes serviceNetwork: - 172.30.0.0/16platform: baremetal: apiVIPs: - 192.168.1.240 ingressVIPs: - 192.168.1.241pullSecret: '{"auths":{"fake":{"auth":"aWQ6cGFzcwo="}}}'sshKey: 'ssh-ed25519 AAAA... okd-homelab'compute.replicas: 0 is the key — it makes all three masters schedulable as workers. The machineNetwork only includes VLAN 5. The storage network (VLAN 10) is invisible to Kubernetes — it’s configured at the OS level post-install.
The agent-config.yaml — simplified
The SNO agent-config had full NMState network definitions including Mellanox ports and VLAN sub-interfaces. For Stage 1, I stripped it down to just the onboard NIC:
apiVersion: v1beta1kind: AgentConfigmetadata: name: okdrendezvousIP: 192.168.1.7additionalNTPSources: - 192.168.1.1
hosts: - hostname: node4.okd.sudops.pl role: master rootDeviceHints: deviceName: "/dev/sda" interfaces: - name: eno1 macAddress: "<node4-mac>" networkConfig: interfaces: - name: eno1 type: ethernet state: up ipv4: enabled: true dhcp: false address: - ip: 192.168.1.7 prefix-length: 24 ipv6: enabled: false dns-resolver: config: server: - 192.168.1.12 routes: config: - destination: 0.0.0.0/0 next-hop-address: 192.168.1.1 next-hop-interface: eno1 table-id: 254 # Node 5 and 6: identical structure, different IPs (.8 and .9)No Mellanox config, no bonds, no VLAN sub-interfaces. The storage network is a day-2 operation — apply NMState NNCPs after the cluster is healthy. If a bond config has a typo in agent-config, you regenerate the ISO and reinstall from scratch. With day-2 NNCPs, you edit the YAML and reapply — NMState rolls back automatically on failure.
Attempt 1: the VIP that wasn’t free
First ISO generated, all three nodes booted via JetKVM, Node 4 starts the Assisted Service as the rendezvous host. The monitoring output:
WARNING Cluster validation: api vips <192.168.1.200> is already in use in cidr 192.168.1.0/24The original VIPs were .200 and .201. Something already owns .200.
My first thought was the CRS317 switch — its management IP was 192.168.1.200 from the Stage 0 network config. But I checked: the CRS317 management is at .220, unchanged. The actual owner: Node 1 — the old vanilla Kubernetes cluster that’s still running. Its API VIP is 192.168.1.200. And it can’t be shut down — it’s still serving workloads.
Meanwhile, the openshift-install monitoring binary on my bastion showed something else entirely:
ERROR tls: failed to verify certificate: x509: certificate is valid for kube-cp.homelab.net, kubernetes, kubernetes.default, [...] node1, not api.okd.sudops.plRead that SAN list: kube-cp.homelab.net, node1. That’s the old vanilla Kubernetes cluster. The monitoring binary connects to api.okd.sudops.pl:6443, which resolves to .200 — the old k8s VIP — because that’s what the DNS records say.
At this point two things needed fixing: the VIP collision and the DNS chain. New VIPs: 192.168.1.240 and .241. Updated MikroTik static DNS. But that’s not enough — Pi-hole caches DNS responses, and it was still serving the old .200 address from cache.
# On Pi-holepihole restartdnsWithout flushing the Pi-hole cache, the bastion keeps resolving api.okd.sudops.pl to .200 no matter what the router says. This is the second time the Pi-hole DNS chain caught me — the first was during SNO.
New VIPs: 192.168.1.240 (API) and 192.168.1.241 (Ingress). ISO regenerated.
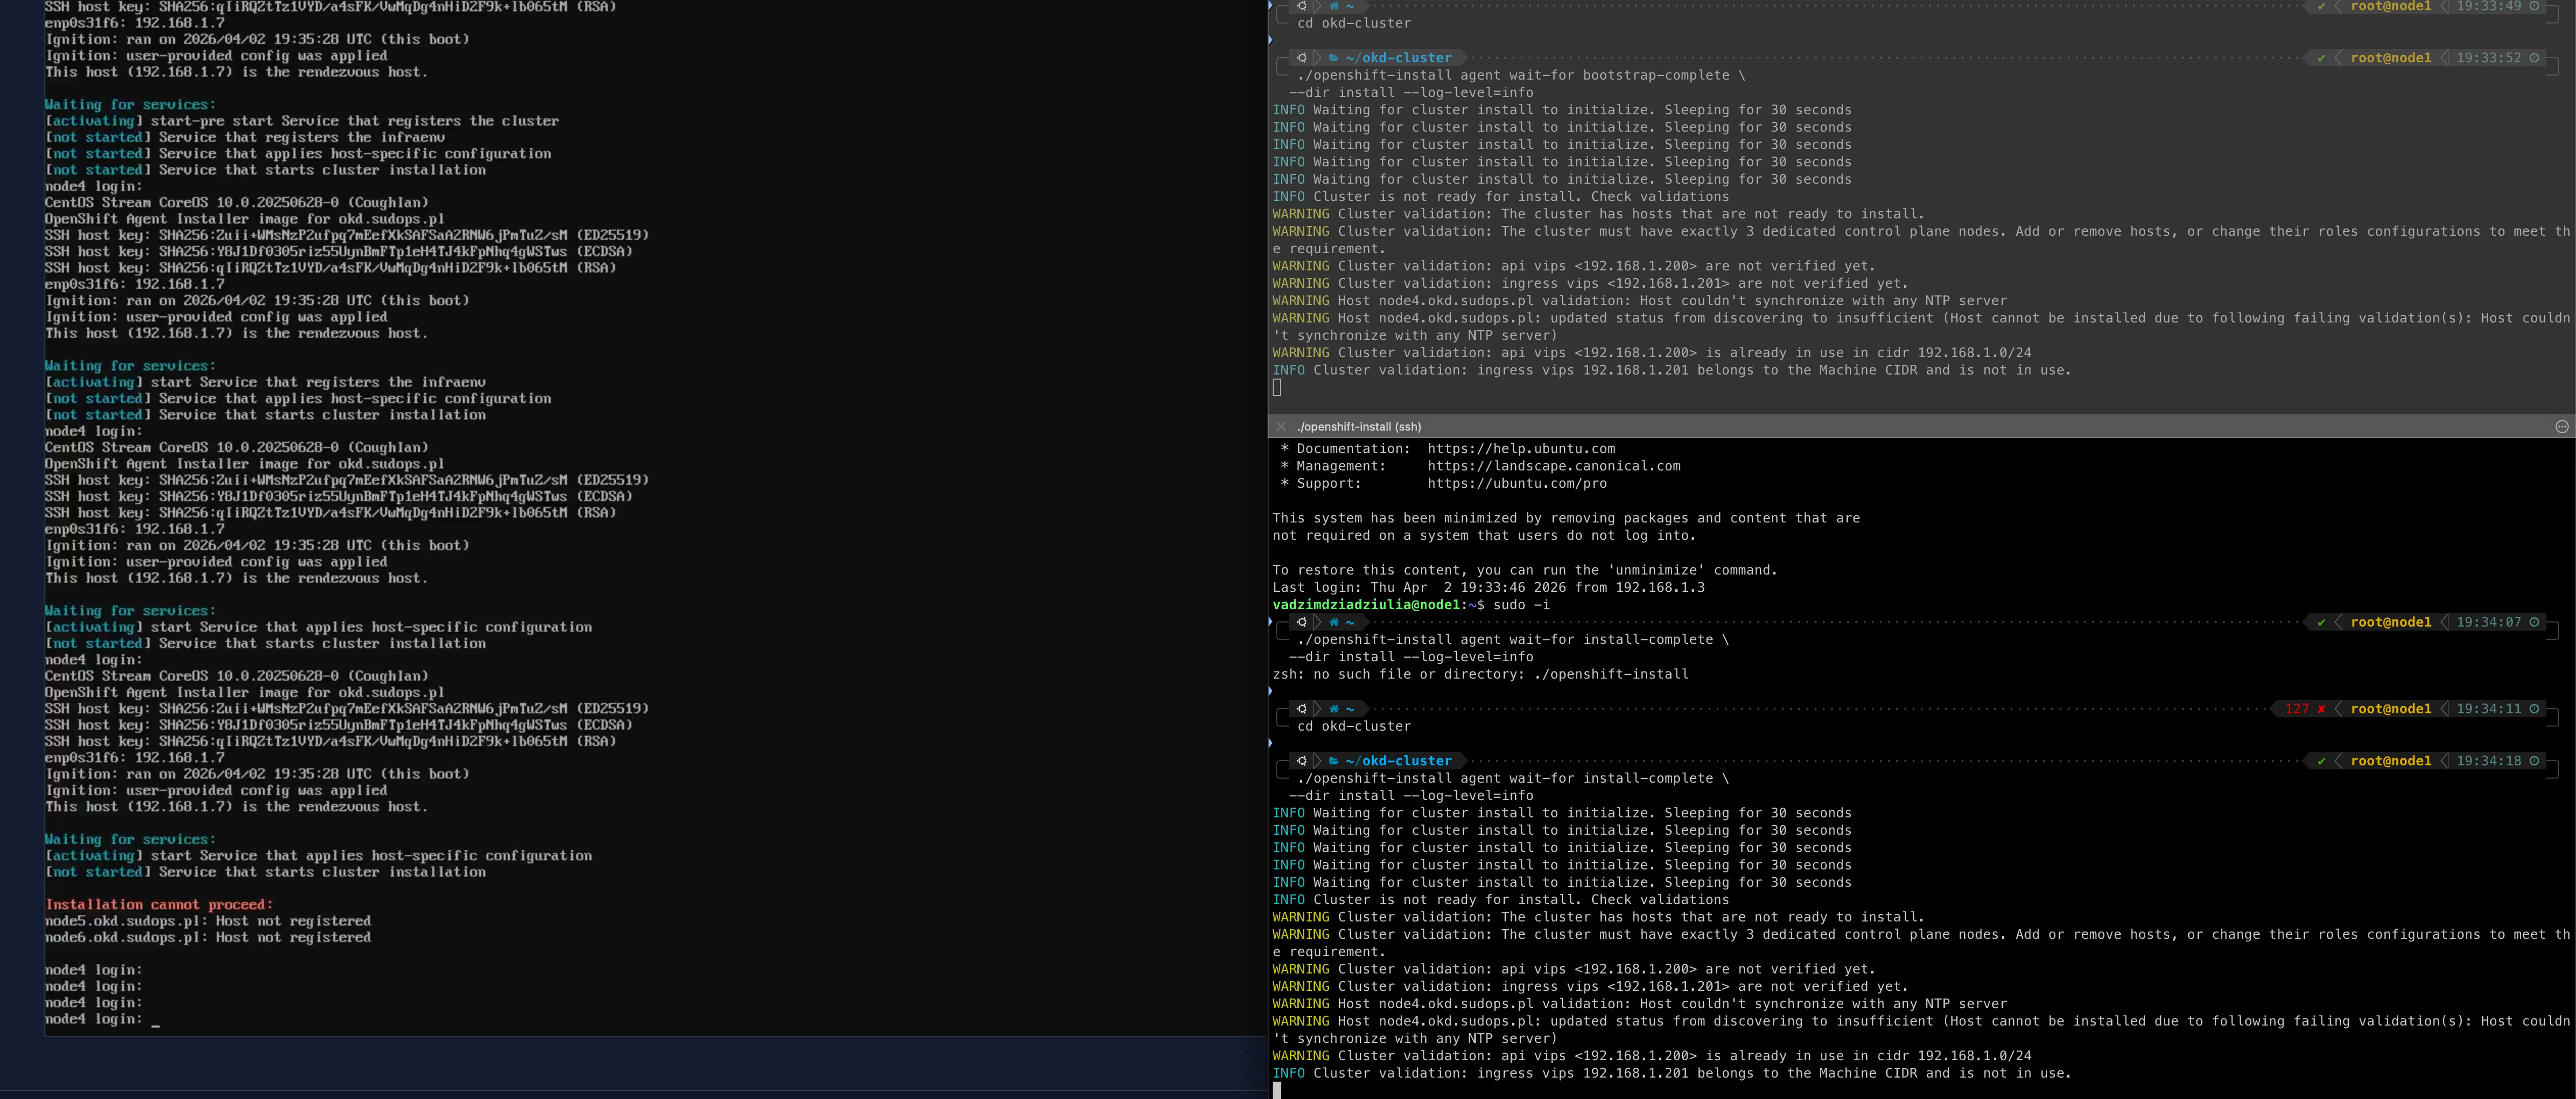
Attempt 2: the NTP nobody configured
Second ISO, same three nodes rebooted. New error:
WARNING Host node4.okd.sudops.pl validation: Host couldn't synchronize with any NTP serverWARNING Host node4.okd.sudops.pl: updated status from discovering to insufficientThe agent-config references additionalNTPSources: 192.168.1.1 — the MikroTik CCR2004 router. Which was never configured as an NTP server. It syncs its own clock (NTP client enabled), but it wasn’t serving time to LAN clients.
/system ntp server set enabled=yesOne command. The validation re-runs every 30 seconds — no reboot needed. Within a minute:
INFO Host node4.okd.sudops.pl validation: Host NTP is syncedINFO Host node4.okd.sudops.pl: validation 'ntp-synced' is now fixedThe boot strategy problem: one JetKVM, three nodes
All three nodes must boot the agent ISO and register with the rendezvous host before installation starts. You can’t bootstrap with one node and join the others later — the Assisted Service waits for the full count defined in agent-config.yaml.
I have one JetKVM. My initial plan: boot Node 4 from the ISO via JetKVM, let it start the Assisted Service, then move the JetKVM to Node 5, boot it, move to Node 6, boot it. Like I’d do with a vanilla Kubernetes cluster — init the first node, then kubeadm join the others.
That doesn’t work. The agent-based installer isn’t kubeadm join. All three nodes need to be booting the ISO simultaneously. Moving the JetKVM between nodes means the first node’s ISO boot finishes and reboots before the third node even starts.
Second idea: boot Node 4 from JetKVM, then quickly unplug and replug the JetKVM to each subsequent node. I thought once a node wrote the image to disk, it was done — just needed the other nodes to register. But the Assisted Service on the rendezvous host needs all three in the discovery phase at the same time.
The solution that worked: JetKVM for Node 4 (rendezvous host), USB sticks with the agent ISO for Nodes 5 and 6. Boot all three within a few minutes of each other. Node 4 via JetKVM virtual media mount, Nodes 5 and 6 from physical USB — select boot device in BIOS and go.
# Write agent ISO to two USB stickssudo dd if=install/agent.x86_64.iso of=/dev/sdb bs=4M status=progresssudo dd if=install/agent.x86_64.iso of=/dev/sdc bs=4M status=progressWithin 10 minutes, all three nodes were in the discovery phase. The Assisted Service validated NTP, connectivity, and VIP availability, then started the install automatically.
Attempt 3: patience
With the boot strategy sorted, all three nodes booted and registered. The monitoring output went through several phases:
INFO Cannot access Rendezvous Host. There may be a network configuration problemThis appeared because the rendezvous host (Node 4) had already rebooted from the live ISO into the installed SCOS. The Assisted Service REST API that the monitoring binary polls no longer exists — it’s a bootstrap-phase service only. The message is misleading. After a few minutes, the monitor switched from polling the Assisted Service to polling the Kubernetes API:
INFO Bootstrap Kube API InitializedINFO Bootstrap configMap status is completeINFO Bootstrap is completeThen the wait-for-install-complete command timed out — not because anything was broken, but because operators take time to converge. The ingress controller needs router pods scheduled. The authentication operator waits for ingress. The console waits for authentication. The monitoring stack rolls out in parallel. On a 3-node cluster with 1GbE management network, the full operator convergence takes about 90 minutes.
Mid-convergence:
ERROR Cluster operator authentication Available is FalseERROR Cluster operator ingress Available is FalseINFO Cluster operator kube-apiserver Progressing is TrueINFO Cluster operator monitoring Progressing is True with RollOutInProgressRe-running wait-for-install-complete after giving the operators time finally caught everything in the green:
INFO All cluster operators have completed progressingINFO Checking to see if there is a route at openshift-console/console...INFO Install complete!INFO Access the OpenShift web-console here: https://console-openshift-console.apps.okd.sudops.plINFO Login to the console with user: "kubeadmin", and password: "<redacted>"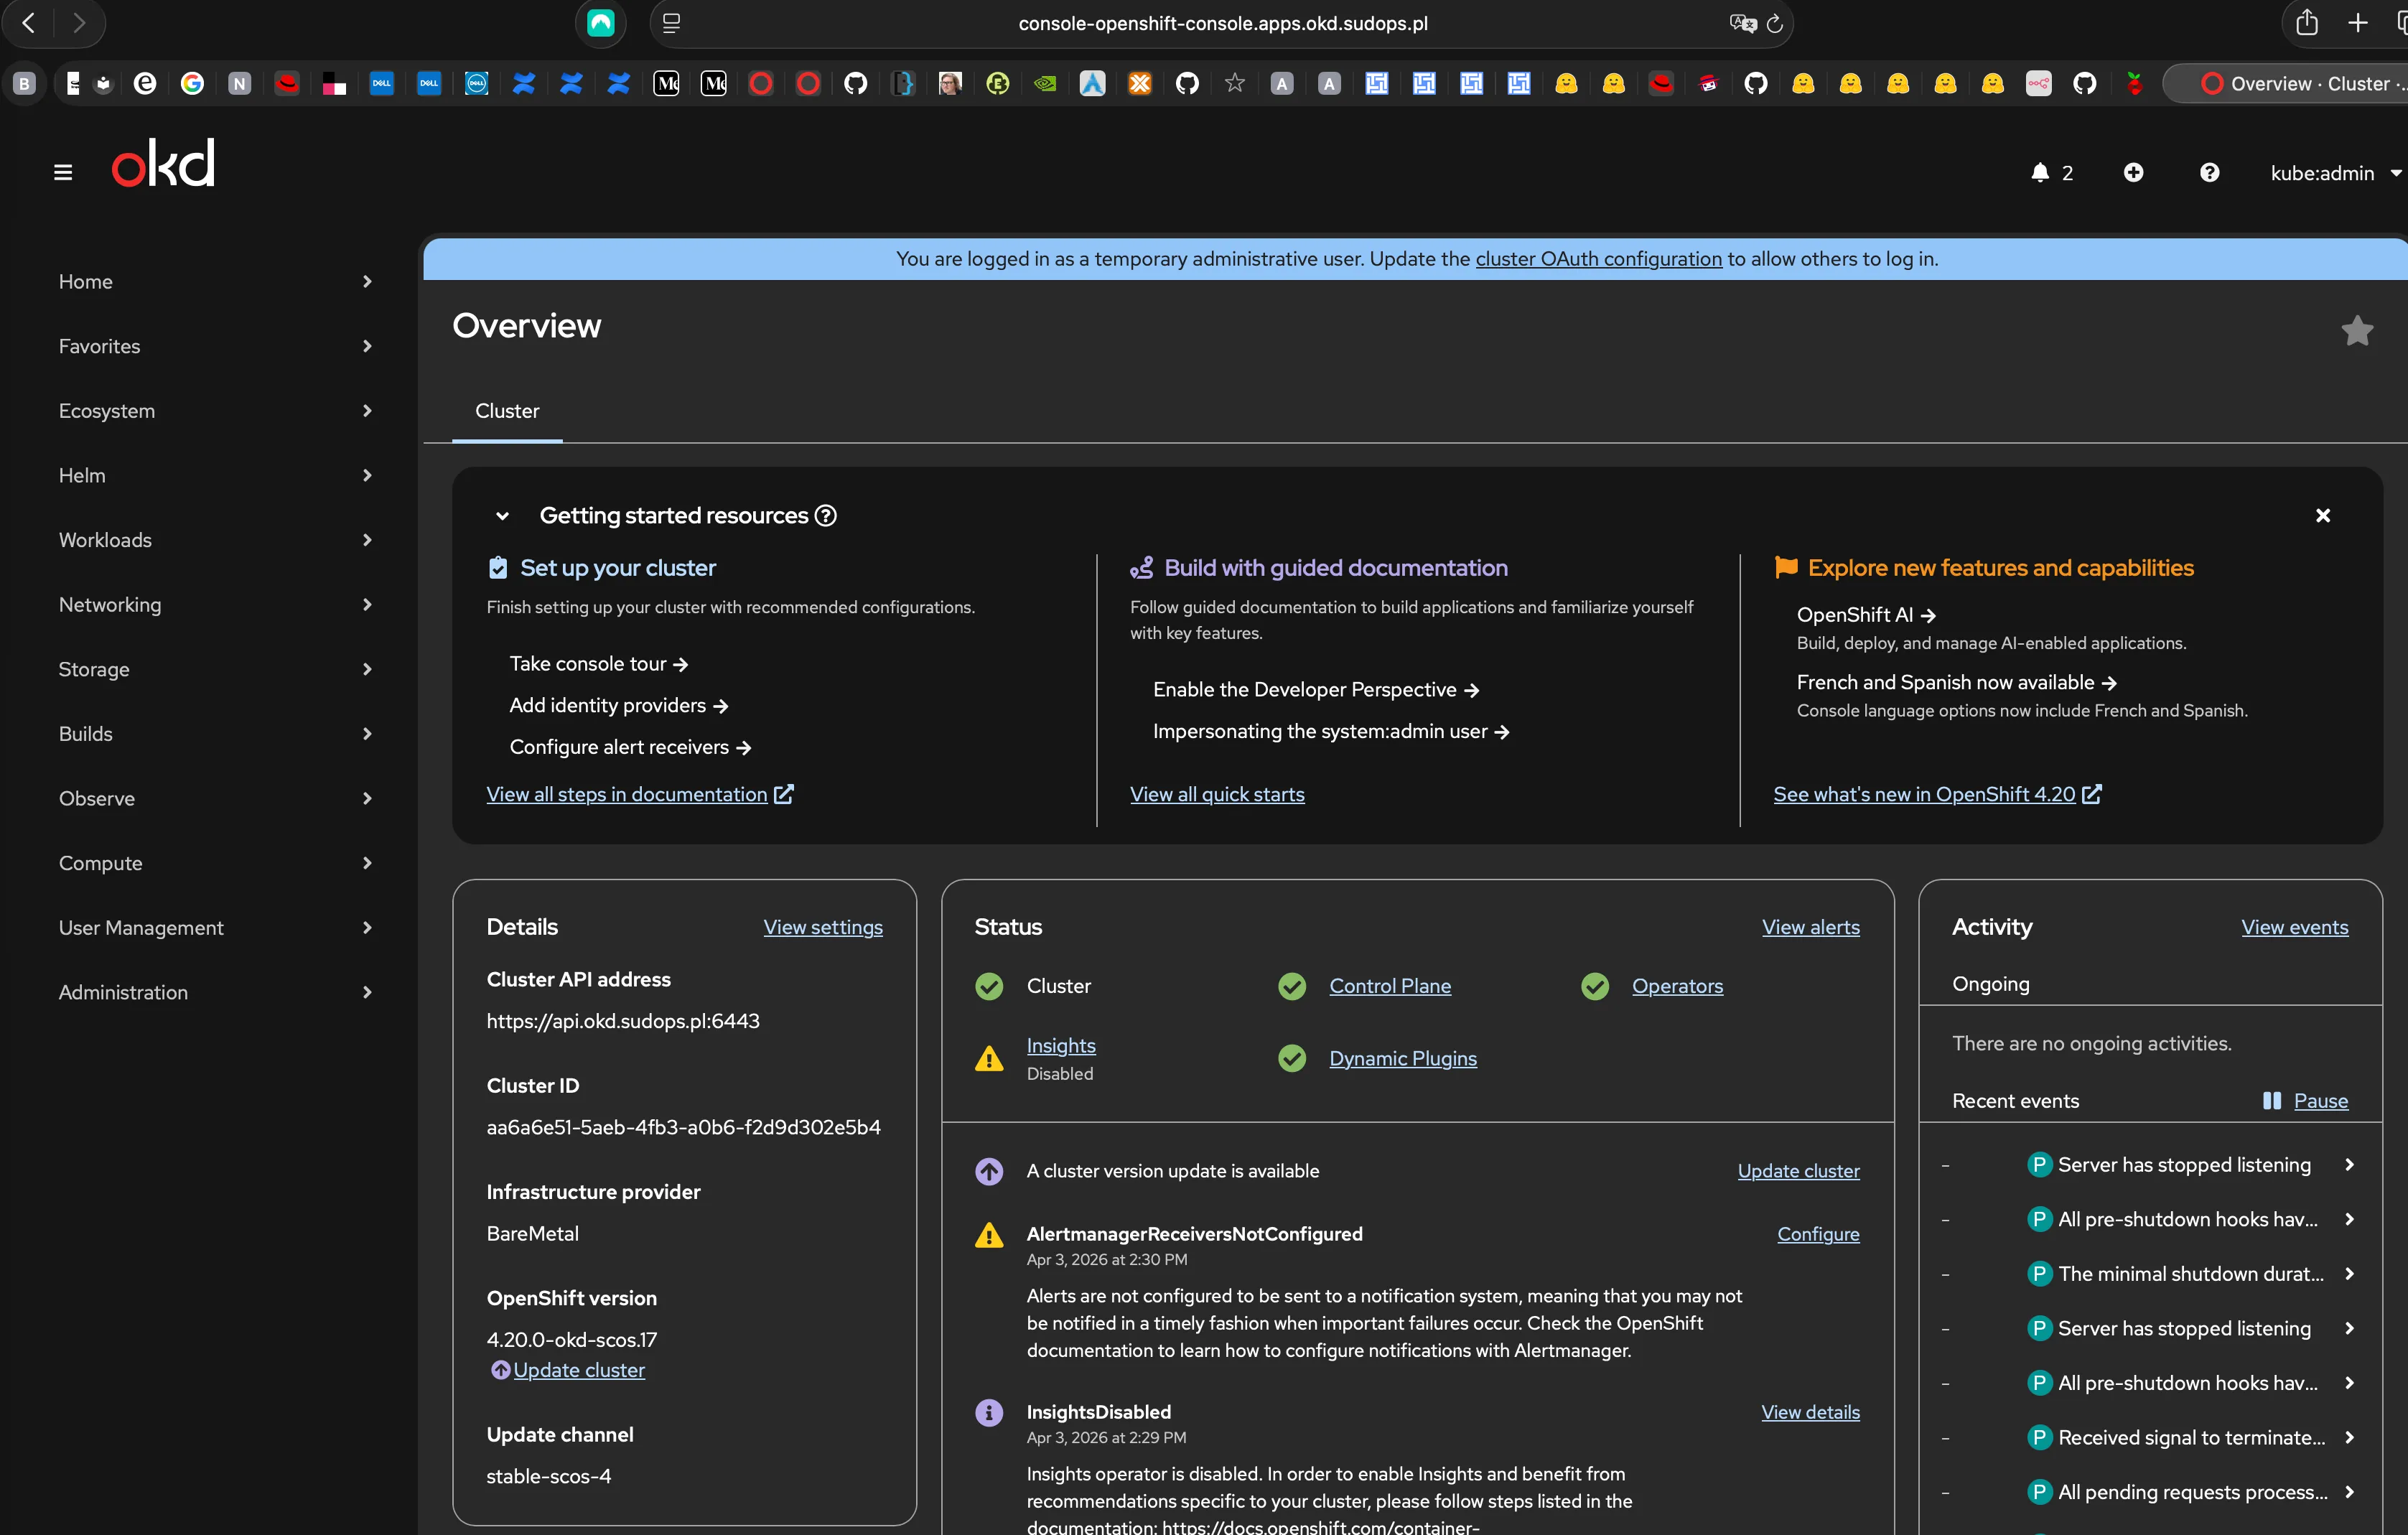
Validation
etcd: three members, all healthy, one leader:
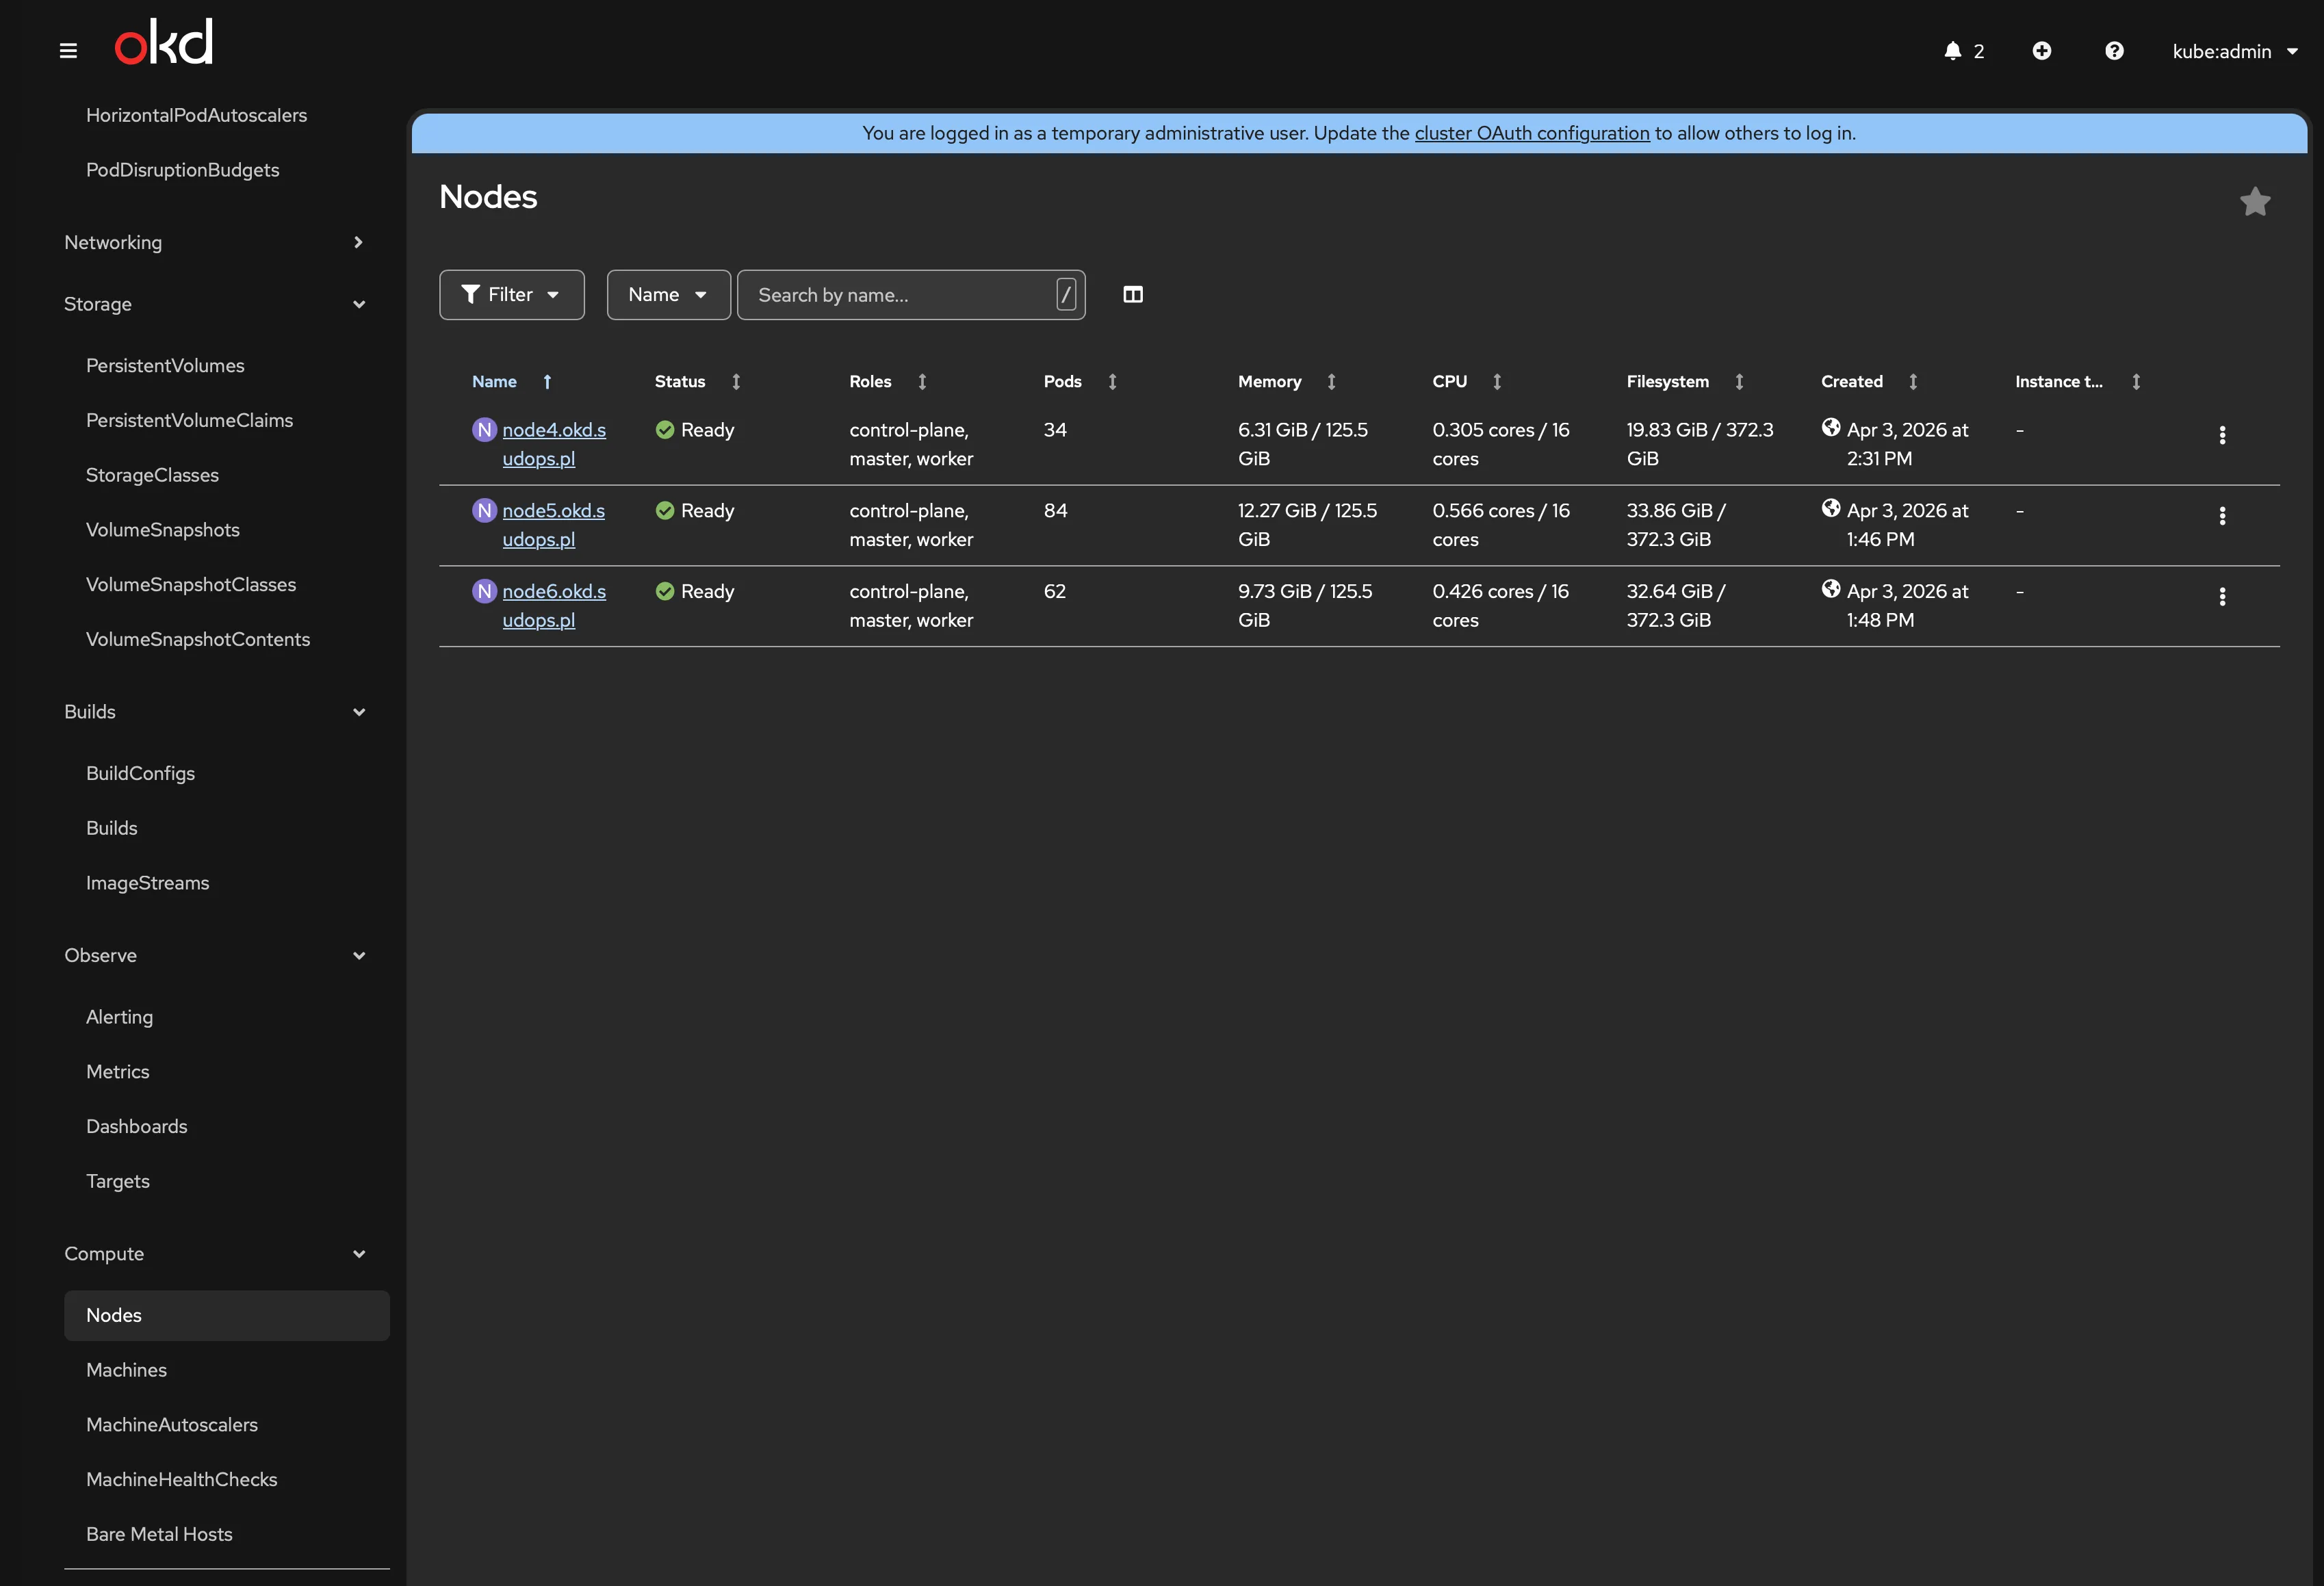
+------------------+---------+---------------------+--------------------------+| ID | STATUS | NAME | PEER ADDRS |+------------------+---------+---------------------+--------------------------+| 3b44327cc0e2ef7c | started | node4.okd.sudops.pl | https://192.168.1.7:2380 || 4e9edf2c412cd00b | started | node6.okd.sudops.pl | https://192.168.1.9:2380 || 7d2314c5333c189a | started | node5.okd.sudops.pl | https://192.168.1.8:2380 |+------------------+---------+---------------------+--------------------------+All 34 cluster operators: Available=True, Progressing=False, Degraded=False. Zero exceptions.
VIP failover: Node 5 holds the API VIP. Draining it moved the VIP to another node within seconds — oc get nodes still works. Uncordoned, VIP moved back.
The split-horizon DNS gotcha
With sudops.pl as the baseDomain, Pi-hole needs to know that *.okd.sudops.pl should go to the router, not upstream DNS. But you can’t just forward all of sudops.pl — that breaks the public blog and Cloudflare records.
The fix is Pi-hole’s conditional forwarding. In the Pi-hole admin UI under Settings → DNS → Conditional forwarding, add a reverse server entry:
true,192.168.1.0/24,192.168.1.1,okd.sudops.plThis tells Pi-hole to forward any query for *.okd.sudops.pl to the MikroTik router at 192.168.1.1, which has the static DNS entries for the cluster. Everything else goes to upstream DNS normally.
api.okd.sudops.pl → router → 192.168.1.240. sudops.pl → upstream DNS → Cloudflare. Each query goes where it should.
What I’d do differently
Check VIP availability before generating the ISO. A simple arping 192.168.1.200 would have caught the Node 1 conflict before the first boot. Instead, I found out from the Assisted Service validation 10 minutes into the install.
Flush Pi-hole cache every time DNS records change. Updating the router’s static DNS is only half the fix. Pi-hole caches responses — if it cached the old .200 address, it keeps serving it until the cache expires or you force a flush with pihole restartdns. This is the same lesson from SNO, and I still forgot it.
Enable NTP on the router during network setup, not during OKD install. The NTP server should have been part of the CCR2004 config in the network implementation post. It’s a one-line command — there’s no reason to discover it’s missing during a cluster install.
Plan the multi-node boot strategy before starting. One JetKVM can’t boot three nodes simultaneously. The agent-based installer needs all hosts in discovery at the same time — this isn’t kubeadm join. Have USB sticks ready, or use HTTP-served ISOs if your JetKVM firmware supports virtual media mount.
Don’t panic when wait-for-install-complete times out. The 60-minute timeout for the monitoring binary is aggressive for a 3-node compact cluster where operators are still converging. If bootstrap completed and oc get co shows operators progressing (not degraded), just wait. Re-run the command.
What’s next
The cluster runs on onboard 1GbE NICs only. Each node has a Mellanox CX4121C with dual 10GbE SFP28 ports sitting idle, waiting for the storage network. Next:
- GitOps — ArgoCD via the okderators catalog, so everything from here on is declarative
- Storage network — NMState NNCPs to configure the 10GbE Mellanox ports on VLAN 10
- Rook-Ceph — NVMe fast pool with replica-3 across all three nodes
- LACP bonds — second Mellanox port added for redundancy (day-2 operation, not a reinstall)
The cluster is running. The hard part isn’t the installer — it’s everything around it.