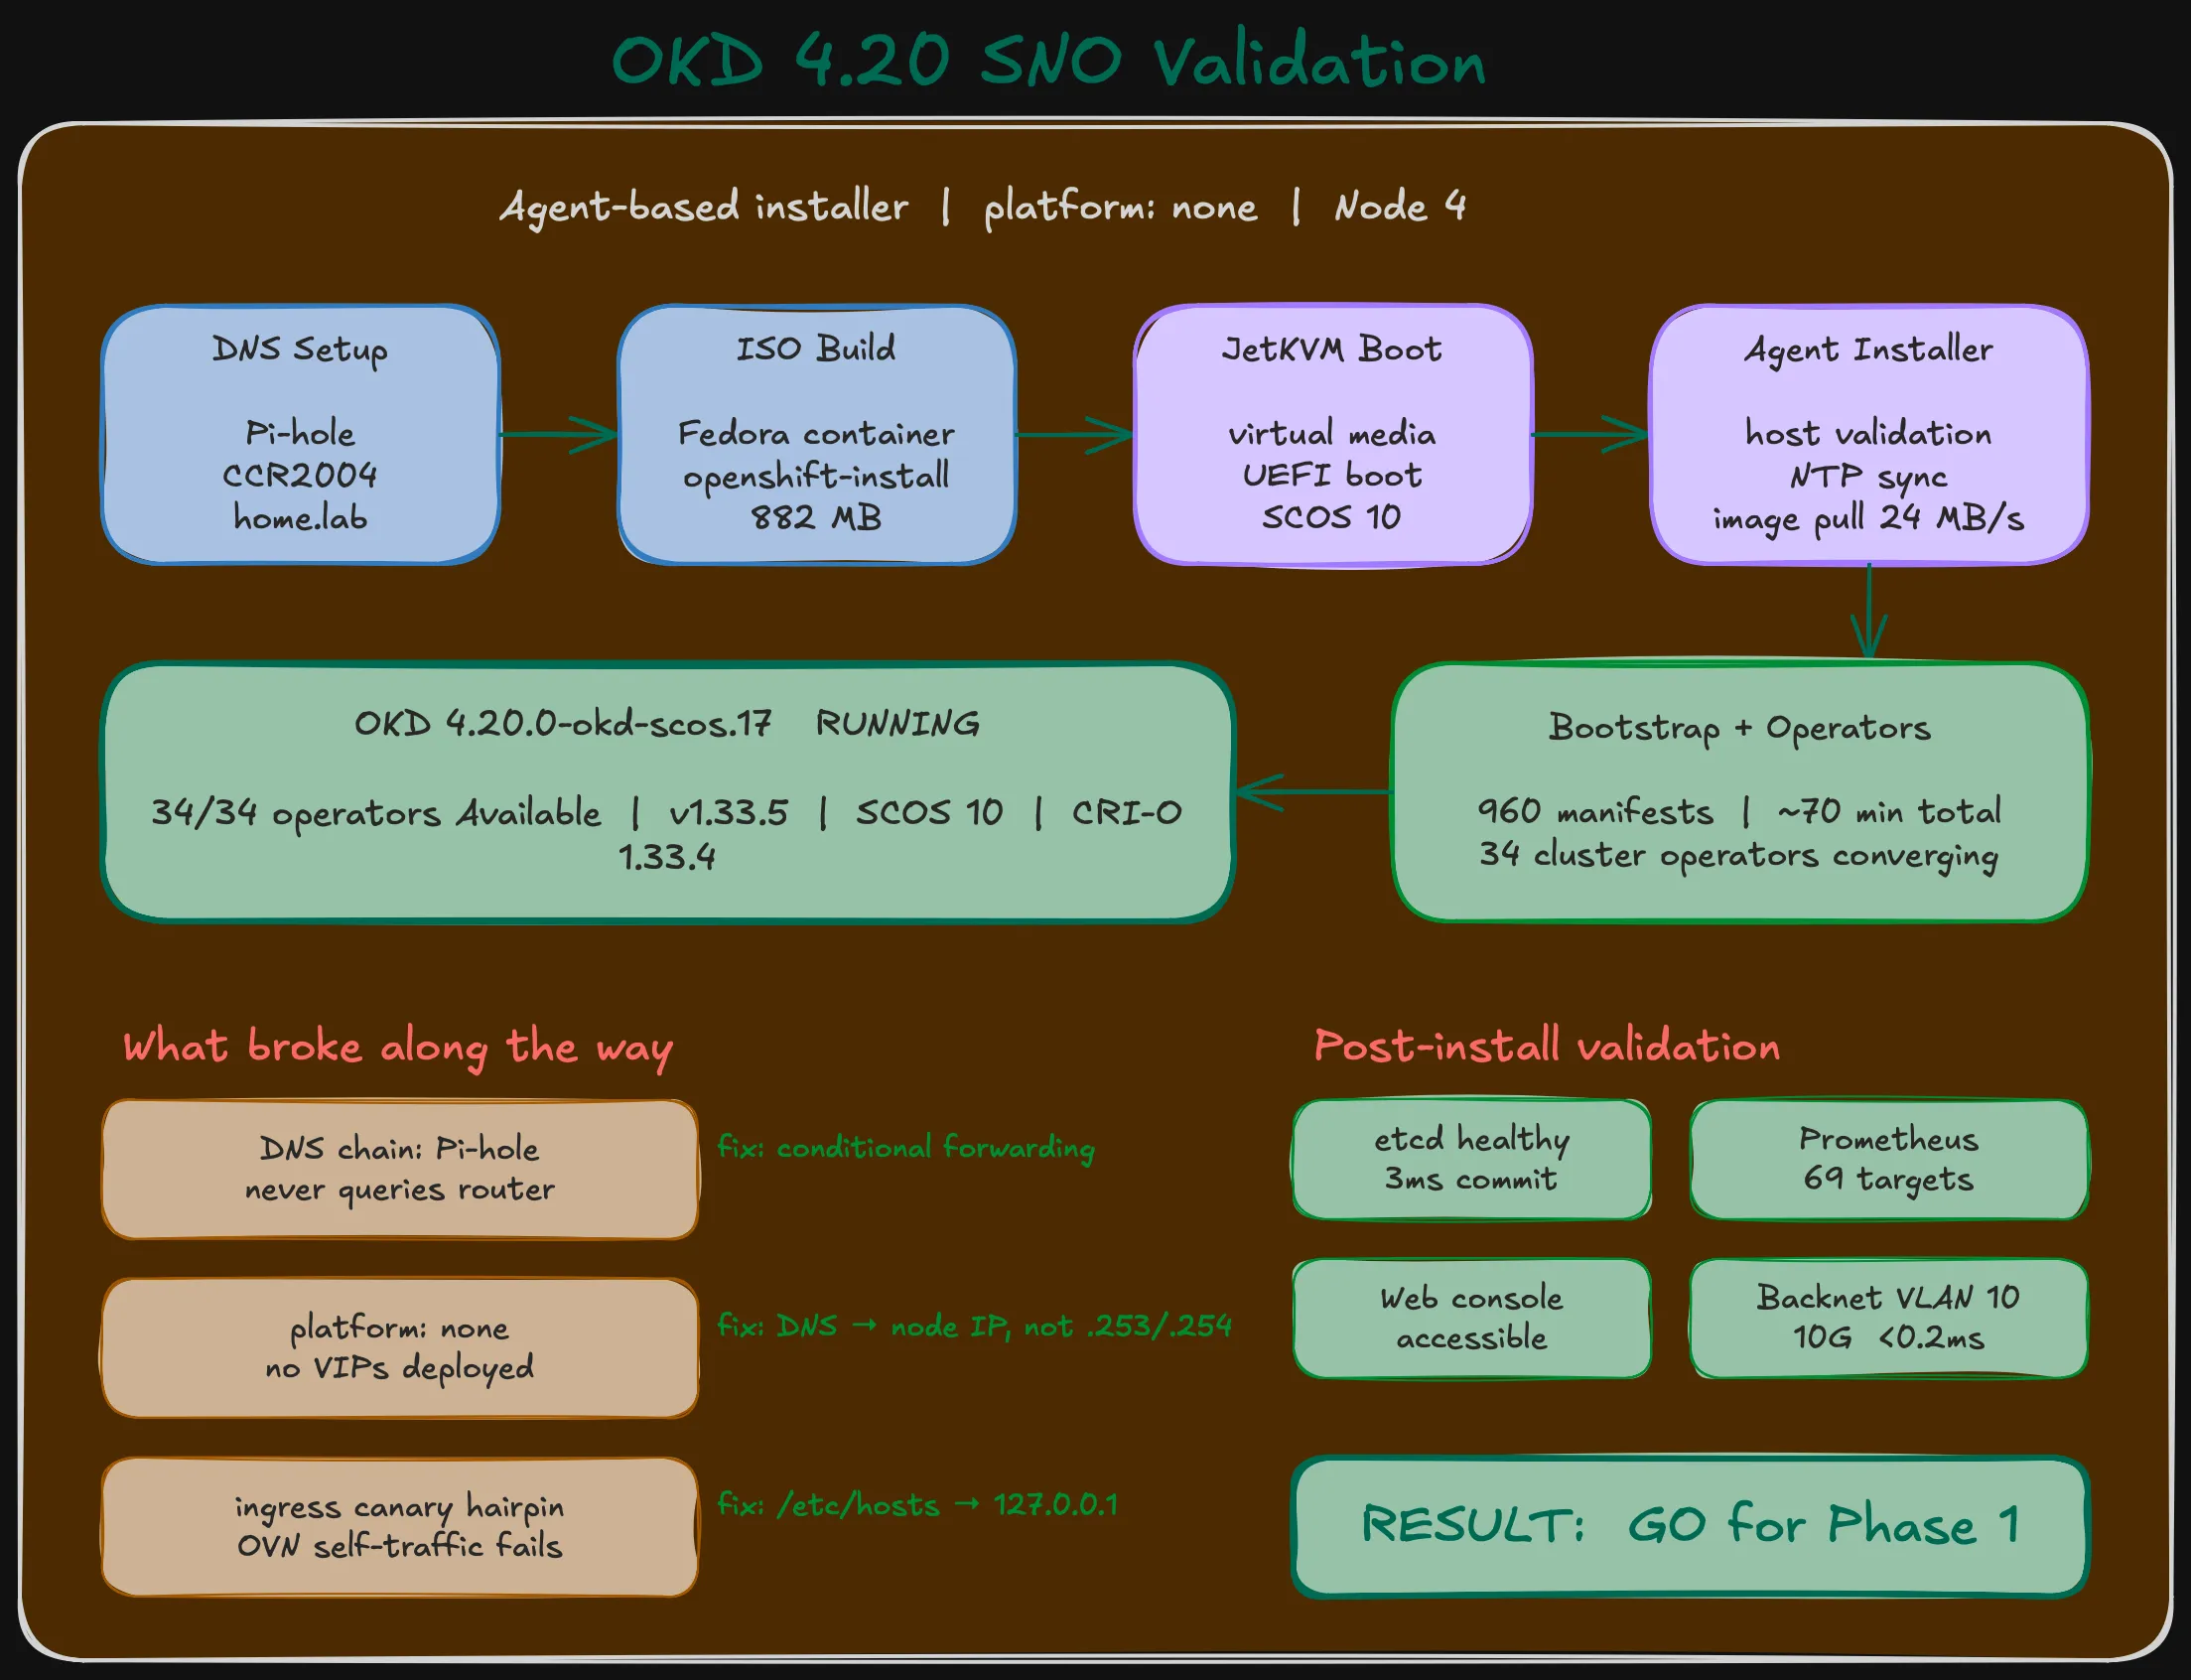
The hardware is validated. The network stack is configured. Time to install OKD 4.20 on a single Dell OptiPlex 5090 SFF and see if everything actually works together.
This post covers Stage 0: deploying OKD 4.20 (SCOS) as a Single Node OpenShift cluster using the agent-based installer. It includes the DNS chain that broke twice, the installer method that doesn’t work, the VIP addresses that nobody listens on, and the 34 cluster operators that eventually all turned green.
The plan
One node, one cluster, one purpose: prove that OKD 4.20 installs and runs on this hardware before ordering two more nodes for Phase 1. Specifically:
- OKD 4.20.0-okd-scos.17 (latest z-stream)
- Agent-based installer (ISO boot, no helper machine)
platform: none(no bare-metal provisioning infrastructure)- All 34 cluster operators healthy
- Backnet (VLAN 10) storage path validated through the CRS317 switch
- etcd on the Intel D3-S3610 boot SSD without slow-disk warnings
Prerequisites: DNS — it’s always DNS
In October 2025, a DNS misconfiguration took down a chunk of AWS. Not a hardware failure, not a DDoS — just DNS doing what DNS does when nobody’s paying attention to the resolution chain. I’d like to say I learned from that. I did not.
The MikroTik network stack from the previous post is already in place. What’s left is DNS — and this is where the first hour went sideways. Then the second hour. Then the third attempt finally worked.
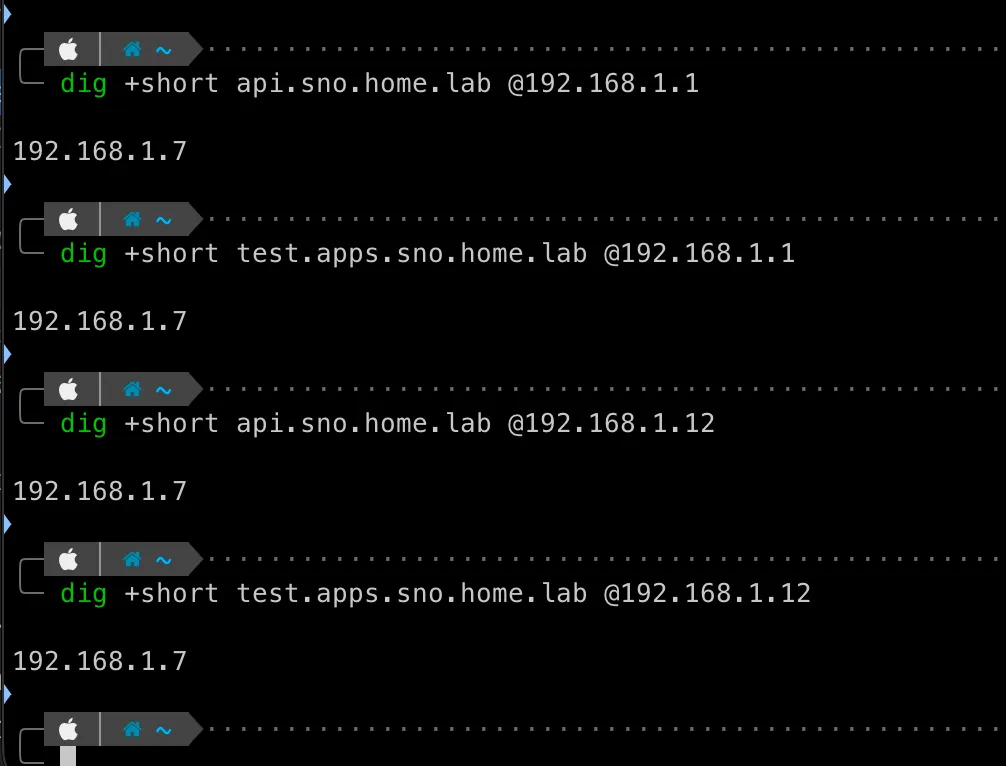
OKD needs three DNS records: api.<cluster>.<domain>, api-int.<cluster>.<domain>, and a wildcard *.apps.<cluster>.<domain>. For SNO with platform: none, all three must point at the node’s IP (192.168.1.7) because there’s no keepalived to manage VIP addresses. Simple enough. Three records. What could go wrong.
DNS failure #1: the chain nobody documents
The DNS chain in this setup:
Node (192.168.1.7) → Pi-hole (192.168.1.12) → ??? → Router (192.168.1.1) → static recordsThe ”???” is the problem. Pi-hole uses OpenDNS as its upstream resolver. It never queries the MikroTik router for local zones. So even though the router has correct records for api.sno.home.lab, the node asks Pi-hole, Pi-hole asks OpenDNS, and OpenDNS has no idea what sno.home.lab is.
The install sits there for an hour, printing “Bootstrap Kube API never initialized” every 30 seconds, because the node can’t resolve its own API endpoint. An hour of staring at logs before I traced the resolution path and realized Pi-hole was sending home.lab queries to the internet.
The fix: Pi-hole conditional forwarding. One line in the Pi-hole DNS settings tells it to forward all home.lab queries to the router:
true,192.168.1.0/24,192.168.1.1,home.labAfter that, the chain works:
Node → Pi-hole → Router → static records → 192.168.1.7DNS failure #2: the name mismatch
Fixed the forwarding. Ran the installer again. Timed out again:
ERROR dial tcp: lookup api.okd.home.lab on 192.168.1.12:53: no such hostThe install-config had name: sno. The DNS records on the router were for api.sno.home.lab. But I had stale records from a previous attempt using name: okd — the installer was resolving api.okd.home.lab. The metadata name in the YAML is the DNS prefix. If they don’t match, bootstrap will never initialize.
Two DNS failures, two hours lost. AWS at least had the excuse of operating at planetary scale. I had three records on a router in my living room.
DNS failure #3: the wrong record type
Even after fixing the chain and the name, the wildcard *.apps.sno.home.lab didn’t resolve correctly at first. RouterOS has two DNS record mechanisms — address= type (resolves locally) and FWD type (forwards to another server). I initially used a FWD record pointing at the node IP. That’s wrong — FWD tells the router to ask 192.168.1.7 to resolve the hostname, and the node has no DNS server. The correct approach is a regex record with address= type that directly returns the IP.
Third attempt worked. Three DNS failures, three different root causes, one lesson: if AWS can go down because of DNS, your homelab definitely will.
Warning (Don't add OKD records in Pi-hole's Local DNS)
Pi-hole’s Local DNS records override conditional forwarding. If you add api.sno.home.lab in the web UI and on the router, the Pi-hole entry wins. Later when you change the router record, Pi-hole serves the stale value. Keep the router as the single source of truth for *.home.lab.
Building the agent ISO
The agent-based installer generates a self-contained ISO with the Assisted Service embedded — no helper machine, no podman containers, no external dependencies during install.
Two YAML files go in: install-config.yaml and agent-config.yaml. The ISO generation requires openshift-install (Linux x86_64 only) and nmstatectl (Fedora/RHEL only). On a Mac, you can’t run either.
Important (Do NOT use the podman-based assisted-service)
The guide at github.com/openshift/assisted-service/deploy/podman is obsolete for OKD 4.20. It tries to pull quay.io/edge-infrastructure/assisted-installer-agent:latest — an OCP-aligned image that doesn’t exist for OKD. The OKD website’s own page for this method warns it “won’t produce a working system.” Use the agent-based installer instead.
install-config.yaml
apiVersion: v1baseDomain: home.labmetadata: name: snocompute: - name: worker replicas: 0controlPlane: name: master replicas: 1networking: networkType: OVNKubernetes clusterNetwork: - cidr: 10.128.0.0/14 hostPrefix: 23 serviceNetwork: - 172.30.0.0/16 machineNetwork: - cidr: 192.168.1.0/24platform: none: {}pullSecret: '{"auths":{"fake":{"auth":"aWQ6cGFzcwo="}}}'sshKey: 'ssh-ed25519 AAAA... okd-homelab'agent-config.yaml
apiVersion: v1beta1kind: AgentConfigmetadata: name: snorendezvousIP: 192.168.1.7hosts: - hostname: sno.home.lab role: master interfaces: - name: enp0s31f6 macAddress: D0:8E:79:05:37:0A networkConfig: interfaces: - name: enp0s31f6 type: ethernet state: up ipv4: enabled: true address: - ip: 192.168.1.7 prefix-length: 24 dhcp: false ipv6: enabled: false dns-resolver: config: server: - 192.168.1.12 routes: config: - destination: 0.0.0.0/0 next-hop-address: 192.168.1.1 next-hop-interface: enp0s31f6I built the ISO from Node 1 (the old Kubernetes node running Ubuntu) using a Fedora container. Create the install/ directory first — the installer writes into it but won’t create it:
mkdir installOne command handles the rest:
sudo podman run --rm -it -v $(pwd):/work -w /work fedora:latest bash -c ' dnf install -y nmstate tar gzip && curl -sL https://github.com/okd-project/okd/releases/download/4.20.0-okd-scos.17/openshift-client-linux-4.20.0-okd-scos.17.tar.gz \ | tar xz -C /usr/local/bin && oc adm release extract --command=openshift-install \ quay.io/okd/scos-release:4.20.0-okd-scos.17 && cp install-config.yaml agent-config.yaml install/ && ./openshift-install agent create image --dir install --log-level=debug'882 MB ISO, built in about 8 minutes. The installer extracted the SCOS base ISO from the release payload, validated the NMState config, and embedded everything into a single bootable image.
After generation, the working directory looks like this:
okd-cluster/├── agent-config.yaml├── install-config.yaml├── openshift-install└── install/ ├── agent.x86_64.iso # 882 MB — the bootable image ├── rendezvousIP # contains "192.168.1.7" └── auth/ ├── kubeadmin-password # generated admin password └── kubeconfig # cluster admin credentialsThe install/auth/ directory is created during ISO generation, not after install completes. The kubeconfig and kubeadmin password are embedded in the ISO and available immediately — you don’t need to wait for the cluster to come up to get them.
Warning (Interface names must match exactly)
The NMState config in agent-config.yaml requires the exact Linux interface name. On the Dell OptiPlex 5090 SFF, the onboard Intel NIC shows as enp0s31f6, not eno1 or enp1s0. The next-hop-interface in the route config must match this exactly. If it doesn’t, nmstatectl fails with “next hop interface not found” and no ISO is generated.
Boot and install
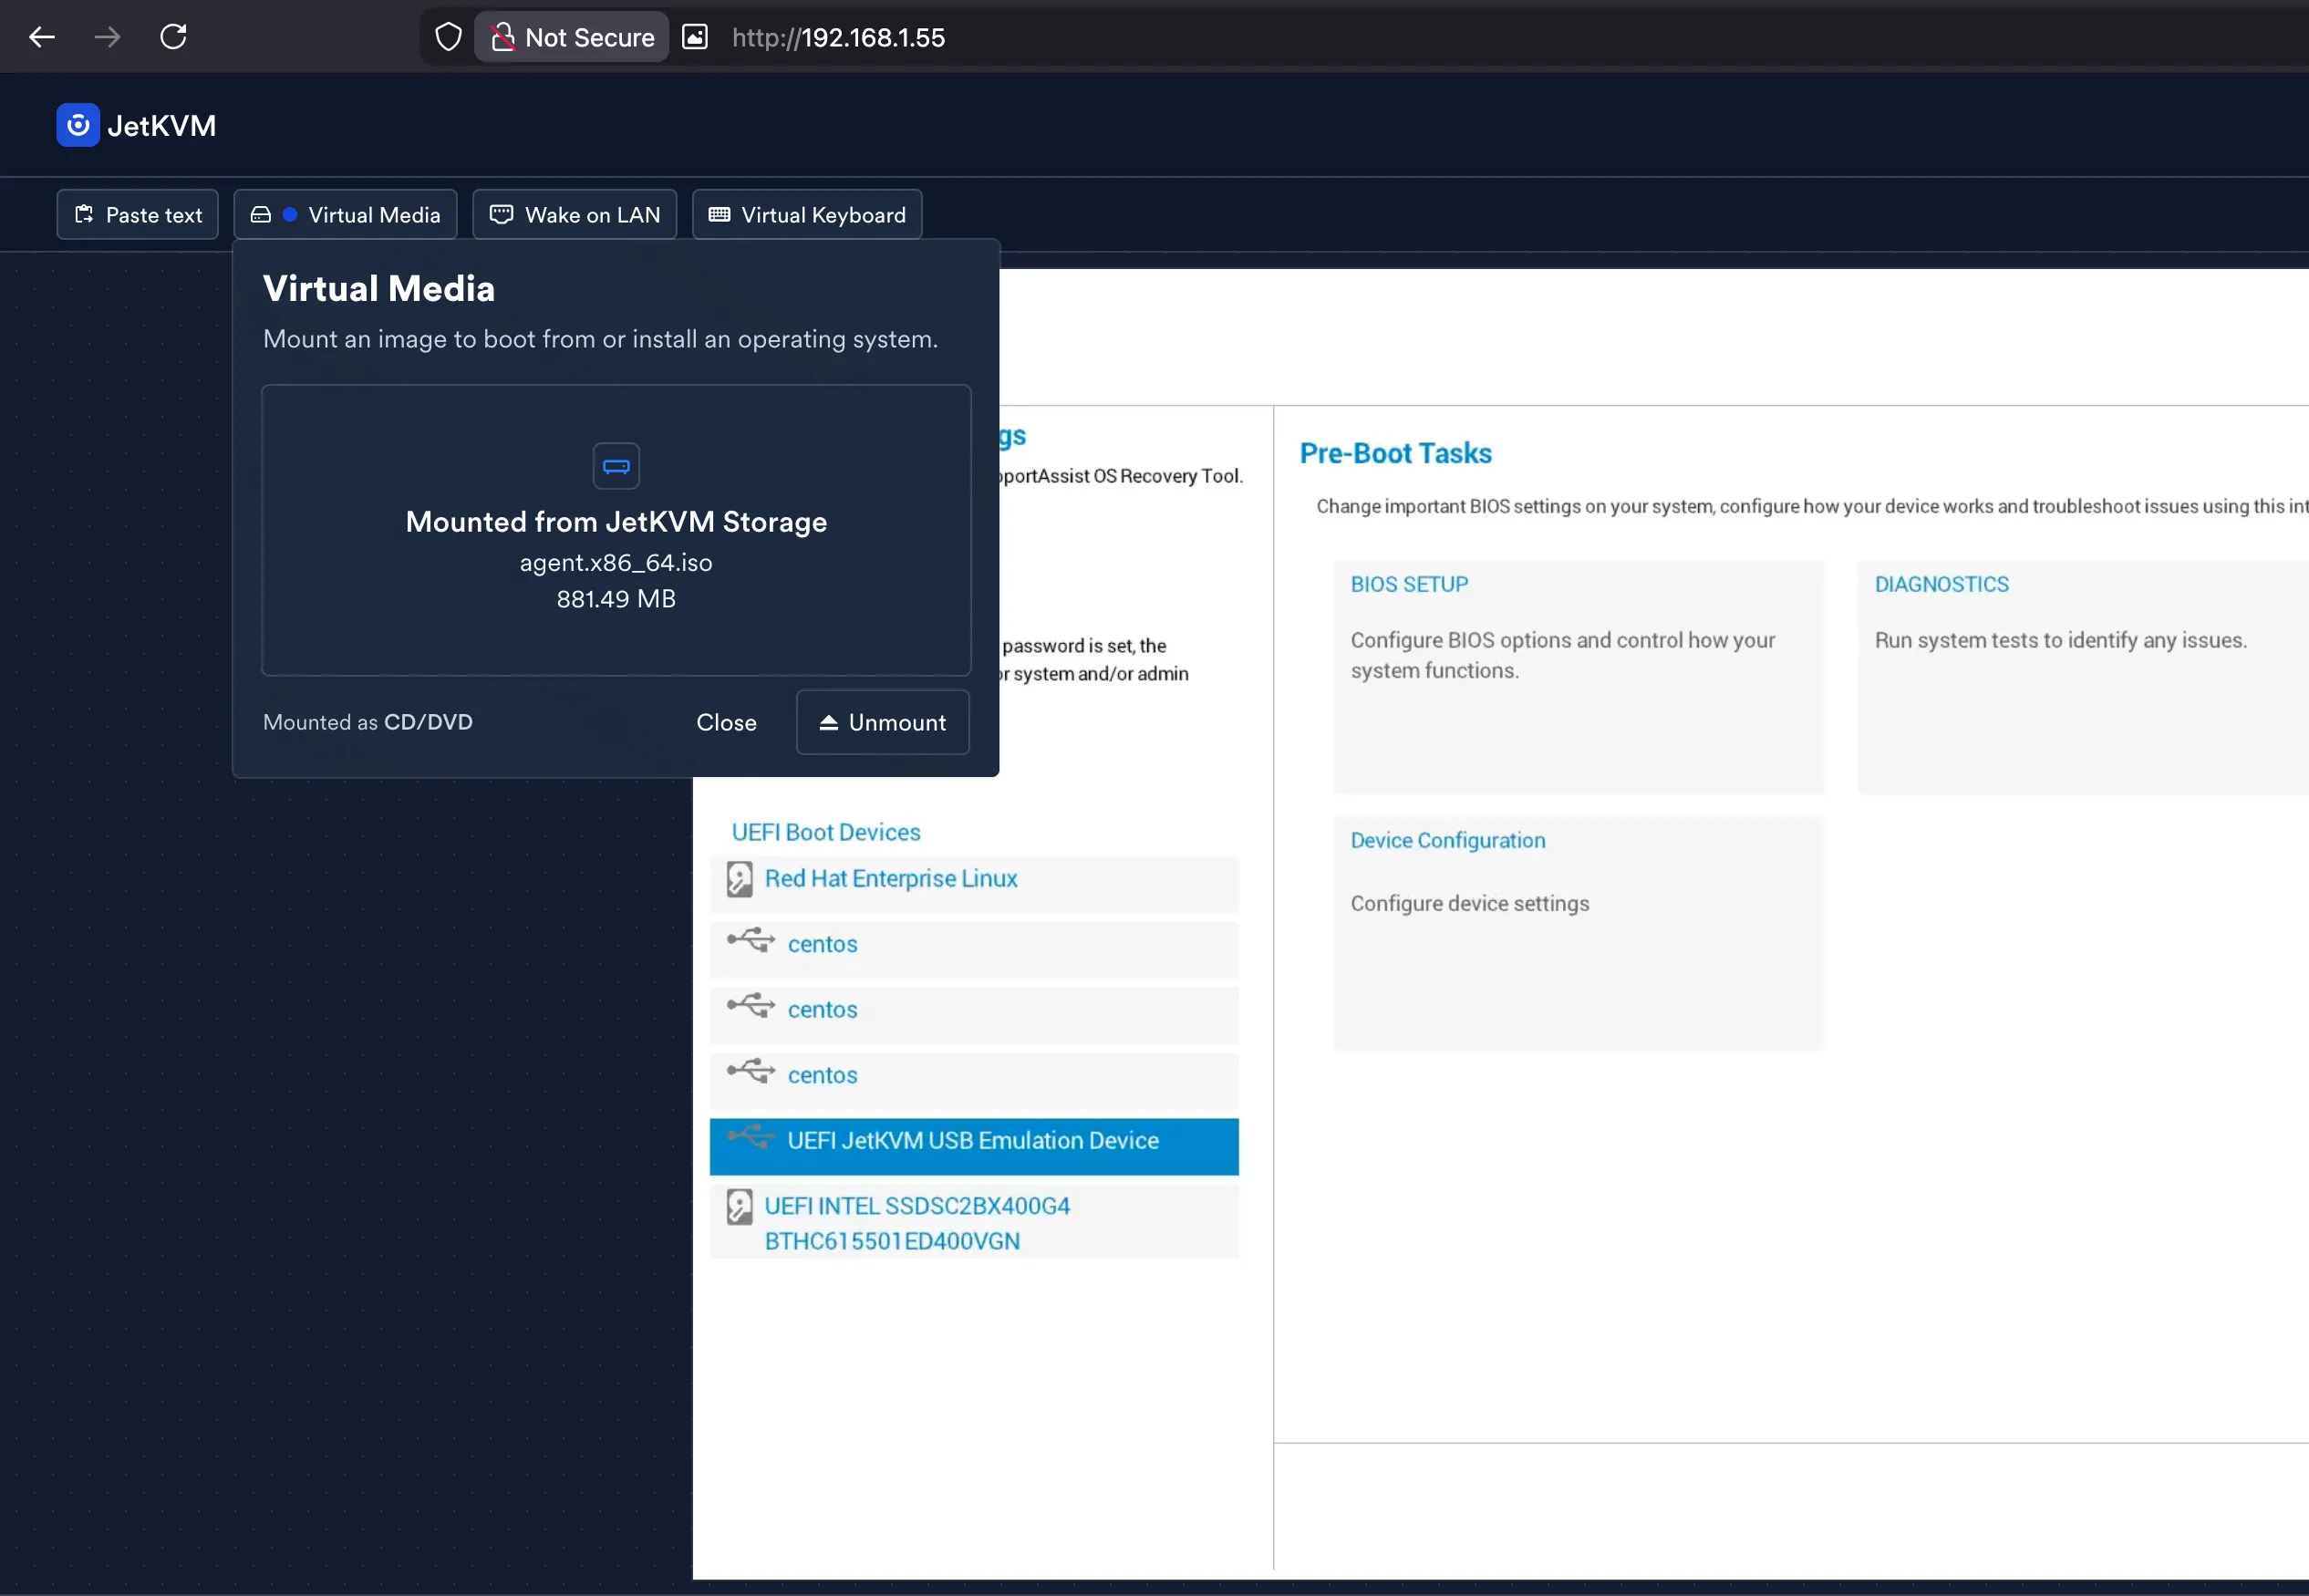
The agent ISO goes onto the JetKVM’s storage and gets mounted as virtual media — no USB drive needed.
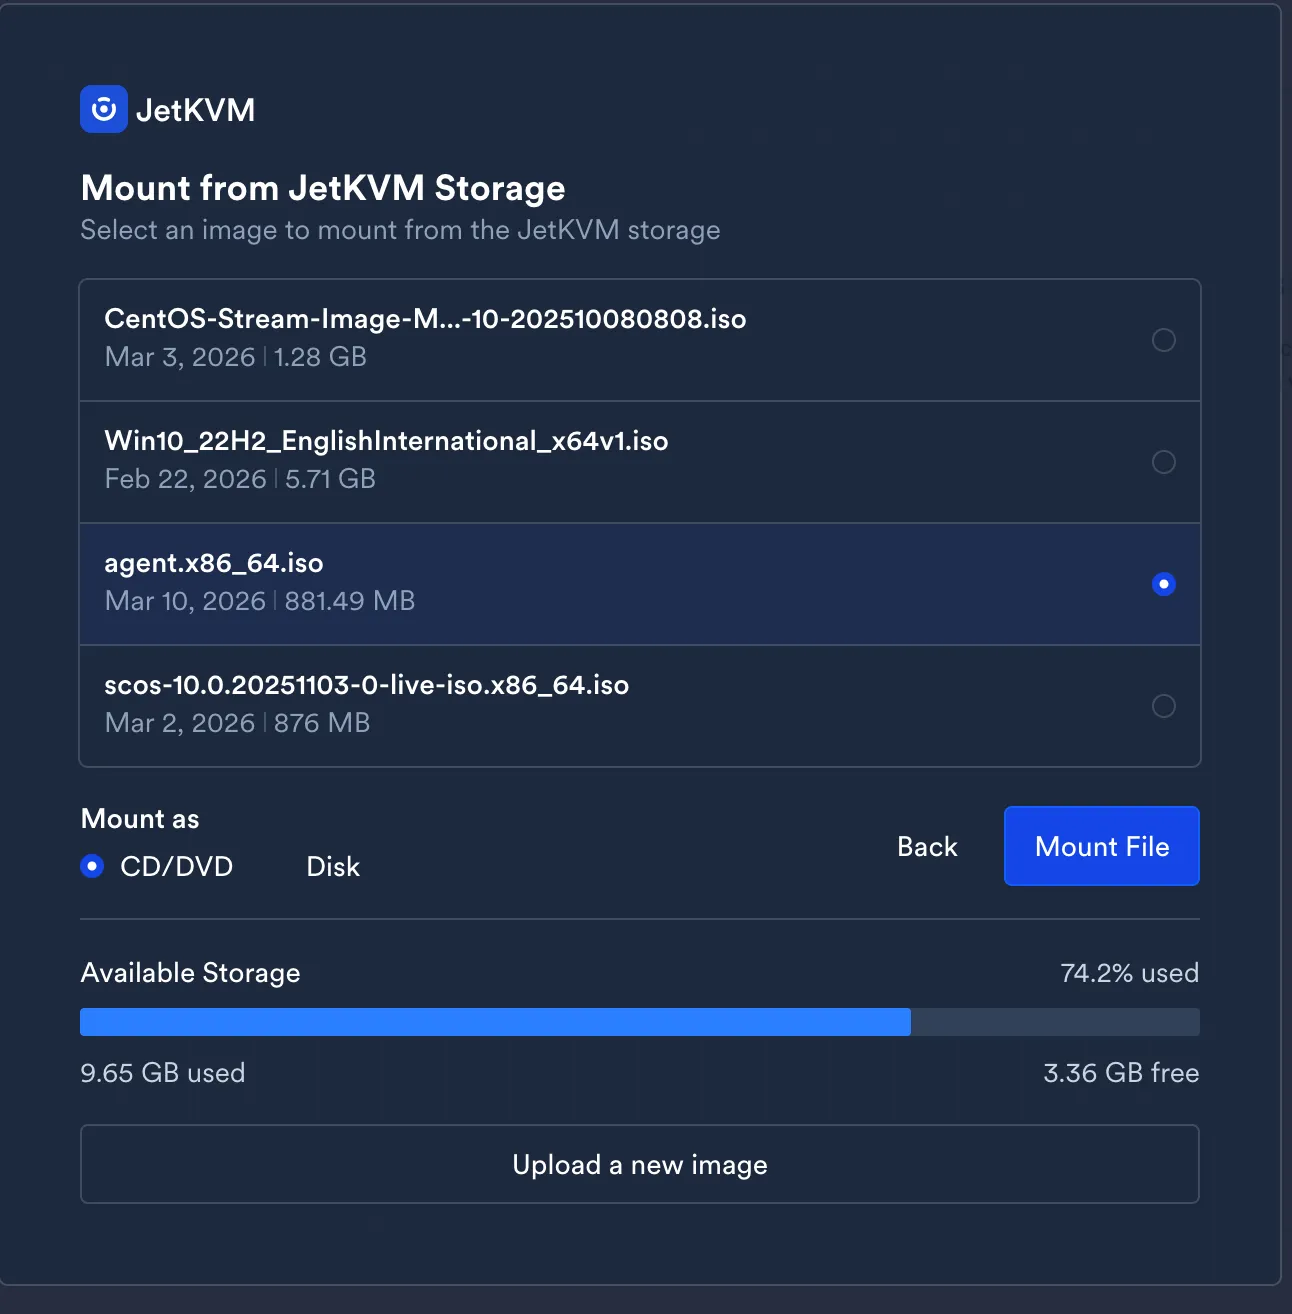
Boot device selection via JetKVM’s browser interface. The Dell BIOS shows both the JetKVM USB emulation device and the existing UEFI entries. Select the JetKVM device.
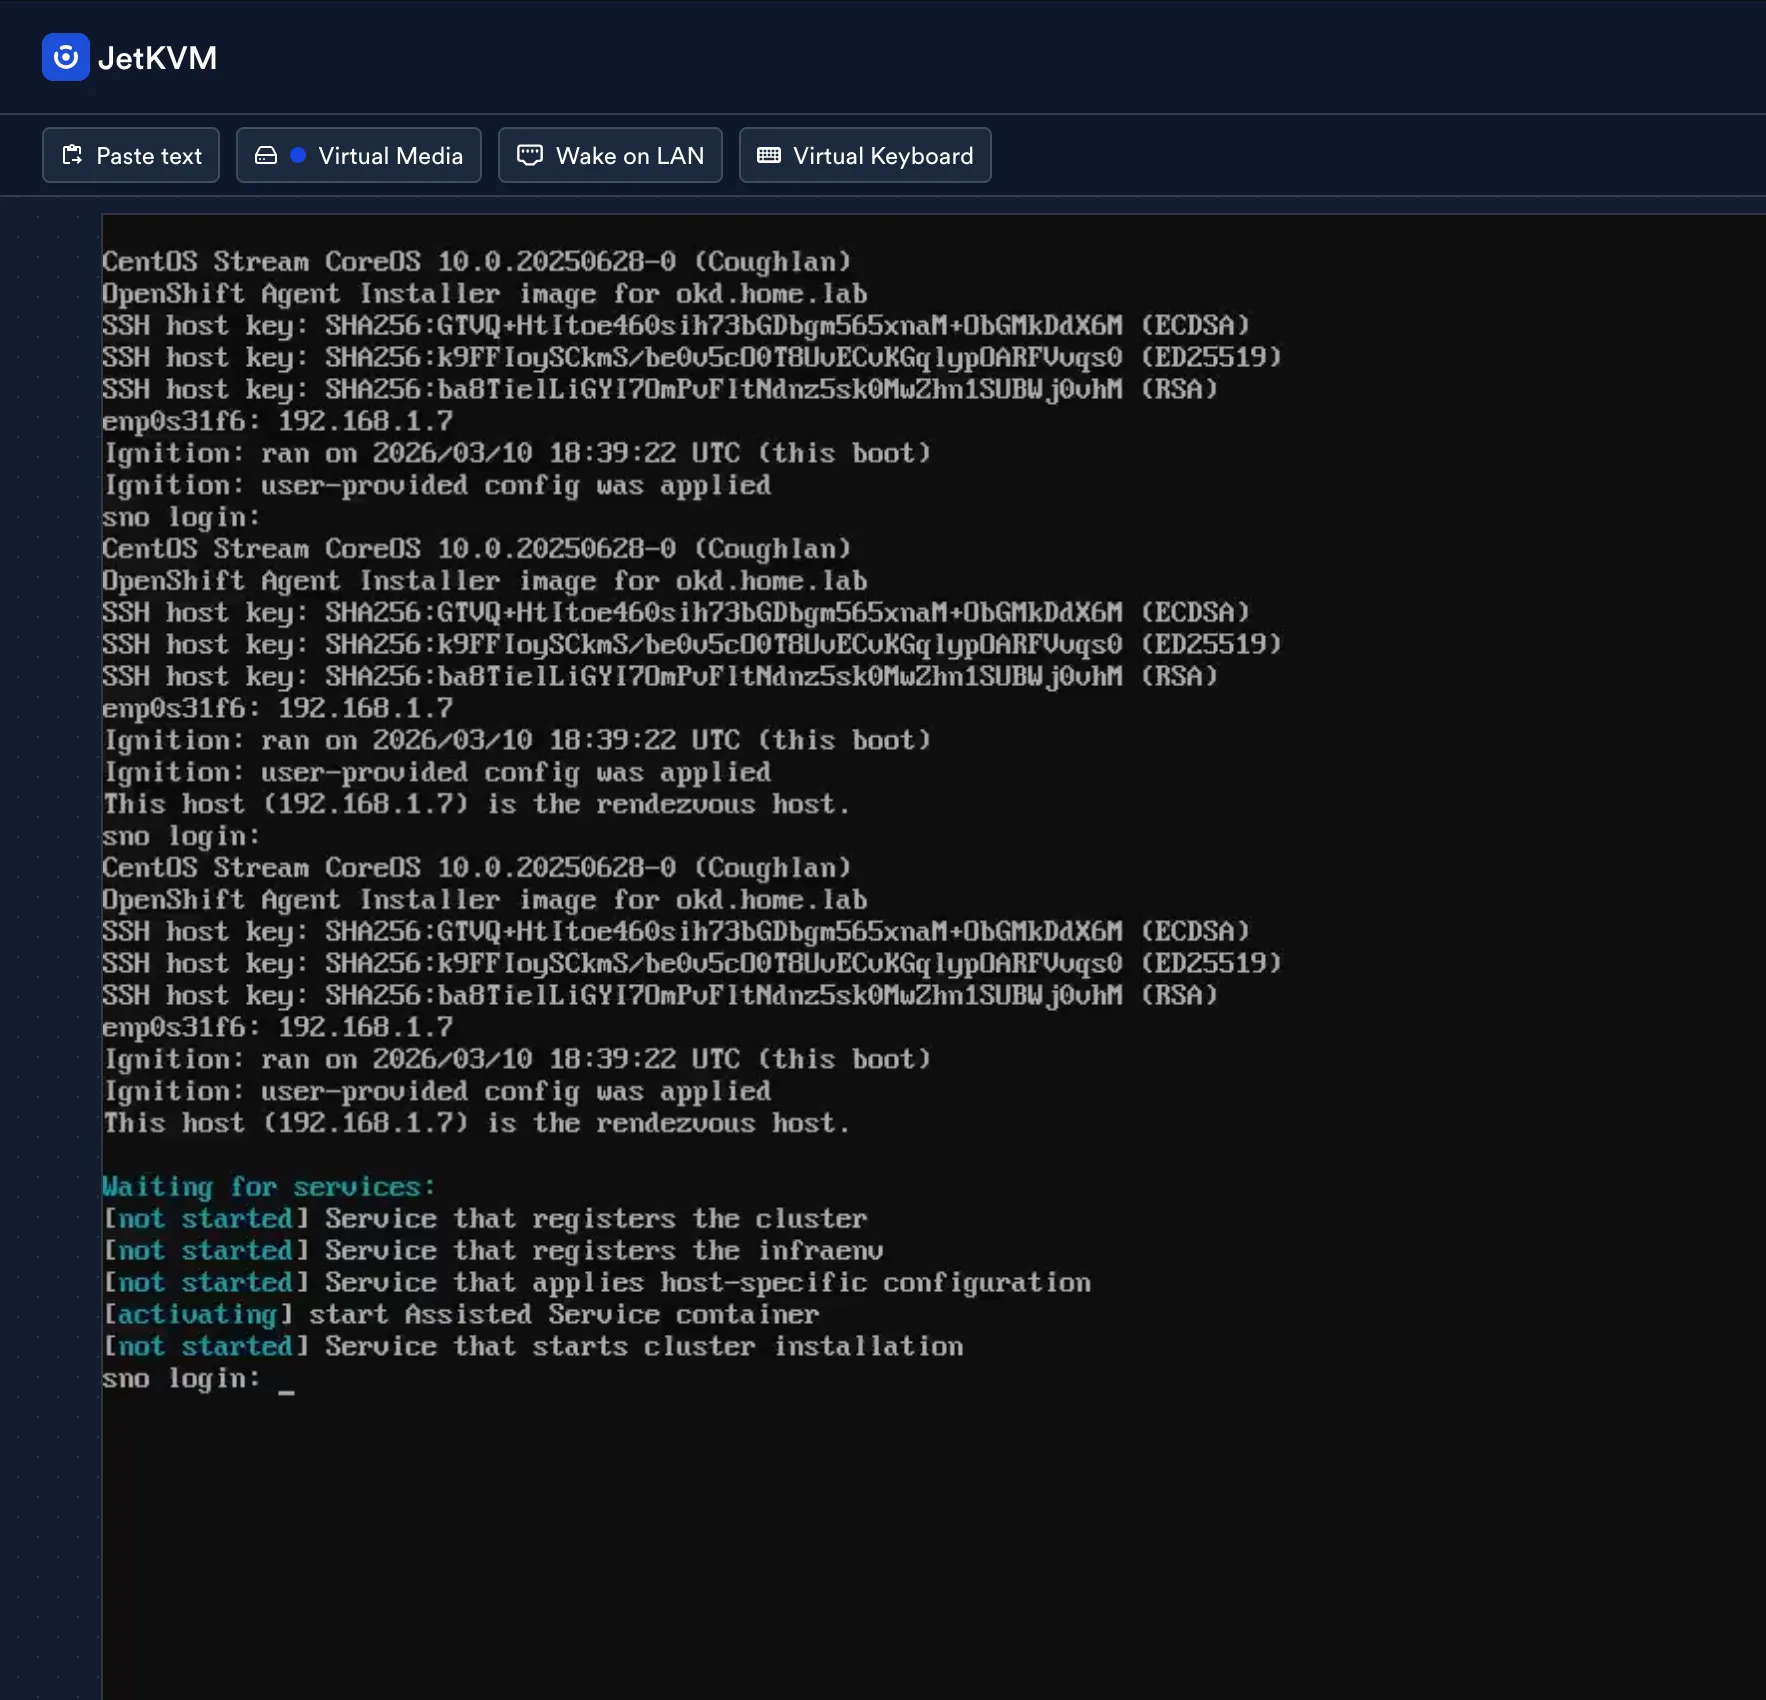
SCOS boots, Ignition config gets applied, and the node announces itself as the rendezvous host:
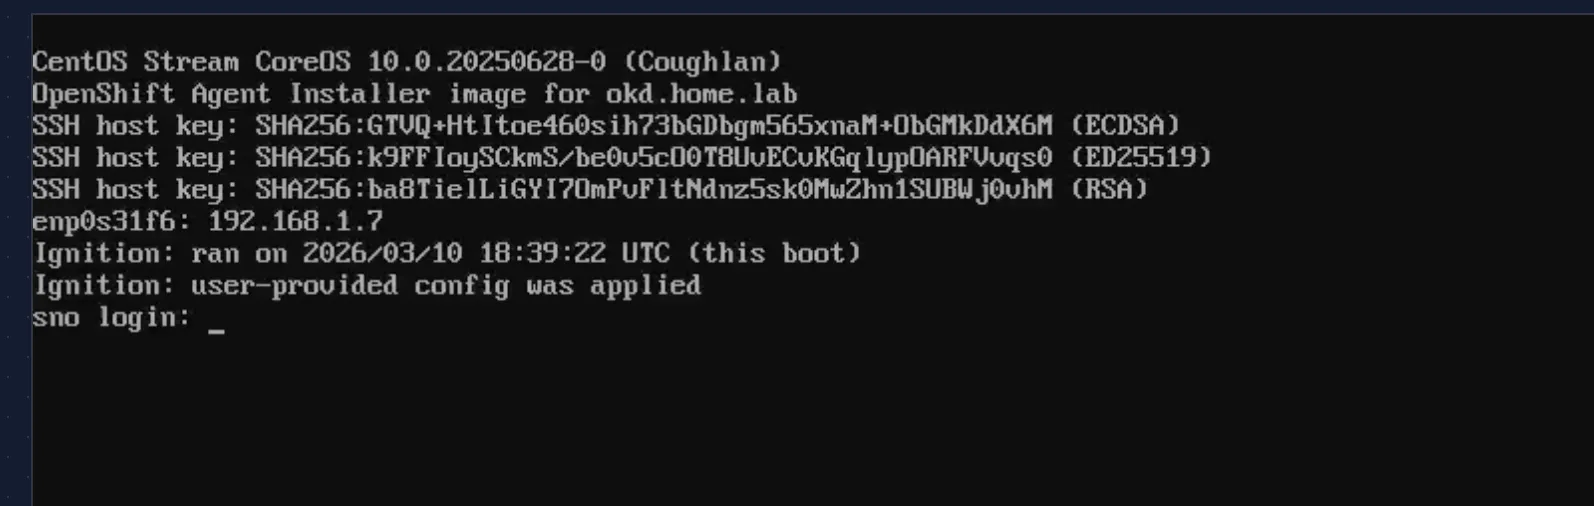

The Assisted Service containers start activating. The console shows “Waiting for services” while the agent service registers the cluster and validates the host:
The install: what the console actually looks like
From a separate terminal on Node 1, monitor the bootstrap:
./openshift-install agent wait-for bootstrap-complete --dir install --log-level=debugYou get a split-screen view: the JetKVM console on the left showing the node’s progress, and the installer output on the right showing validation status.
The host goes through several stages: discovering → insufficient (NTP sync pending) → known → preparing → installing. The NTP sync warning is transient — it resolves within a minute as the node reaches pool.ntp.org.

The validation output confirms everything you’d want to see from a bare-metal install:
Platform OptiPlex 5090 is allowedSufficient CPU cores for role masterSufficient RAM for role masterDomain name resolution for the api.sno.home.lab domain was successfulHost has been configured with at least one default route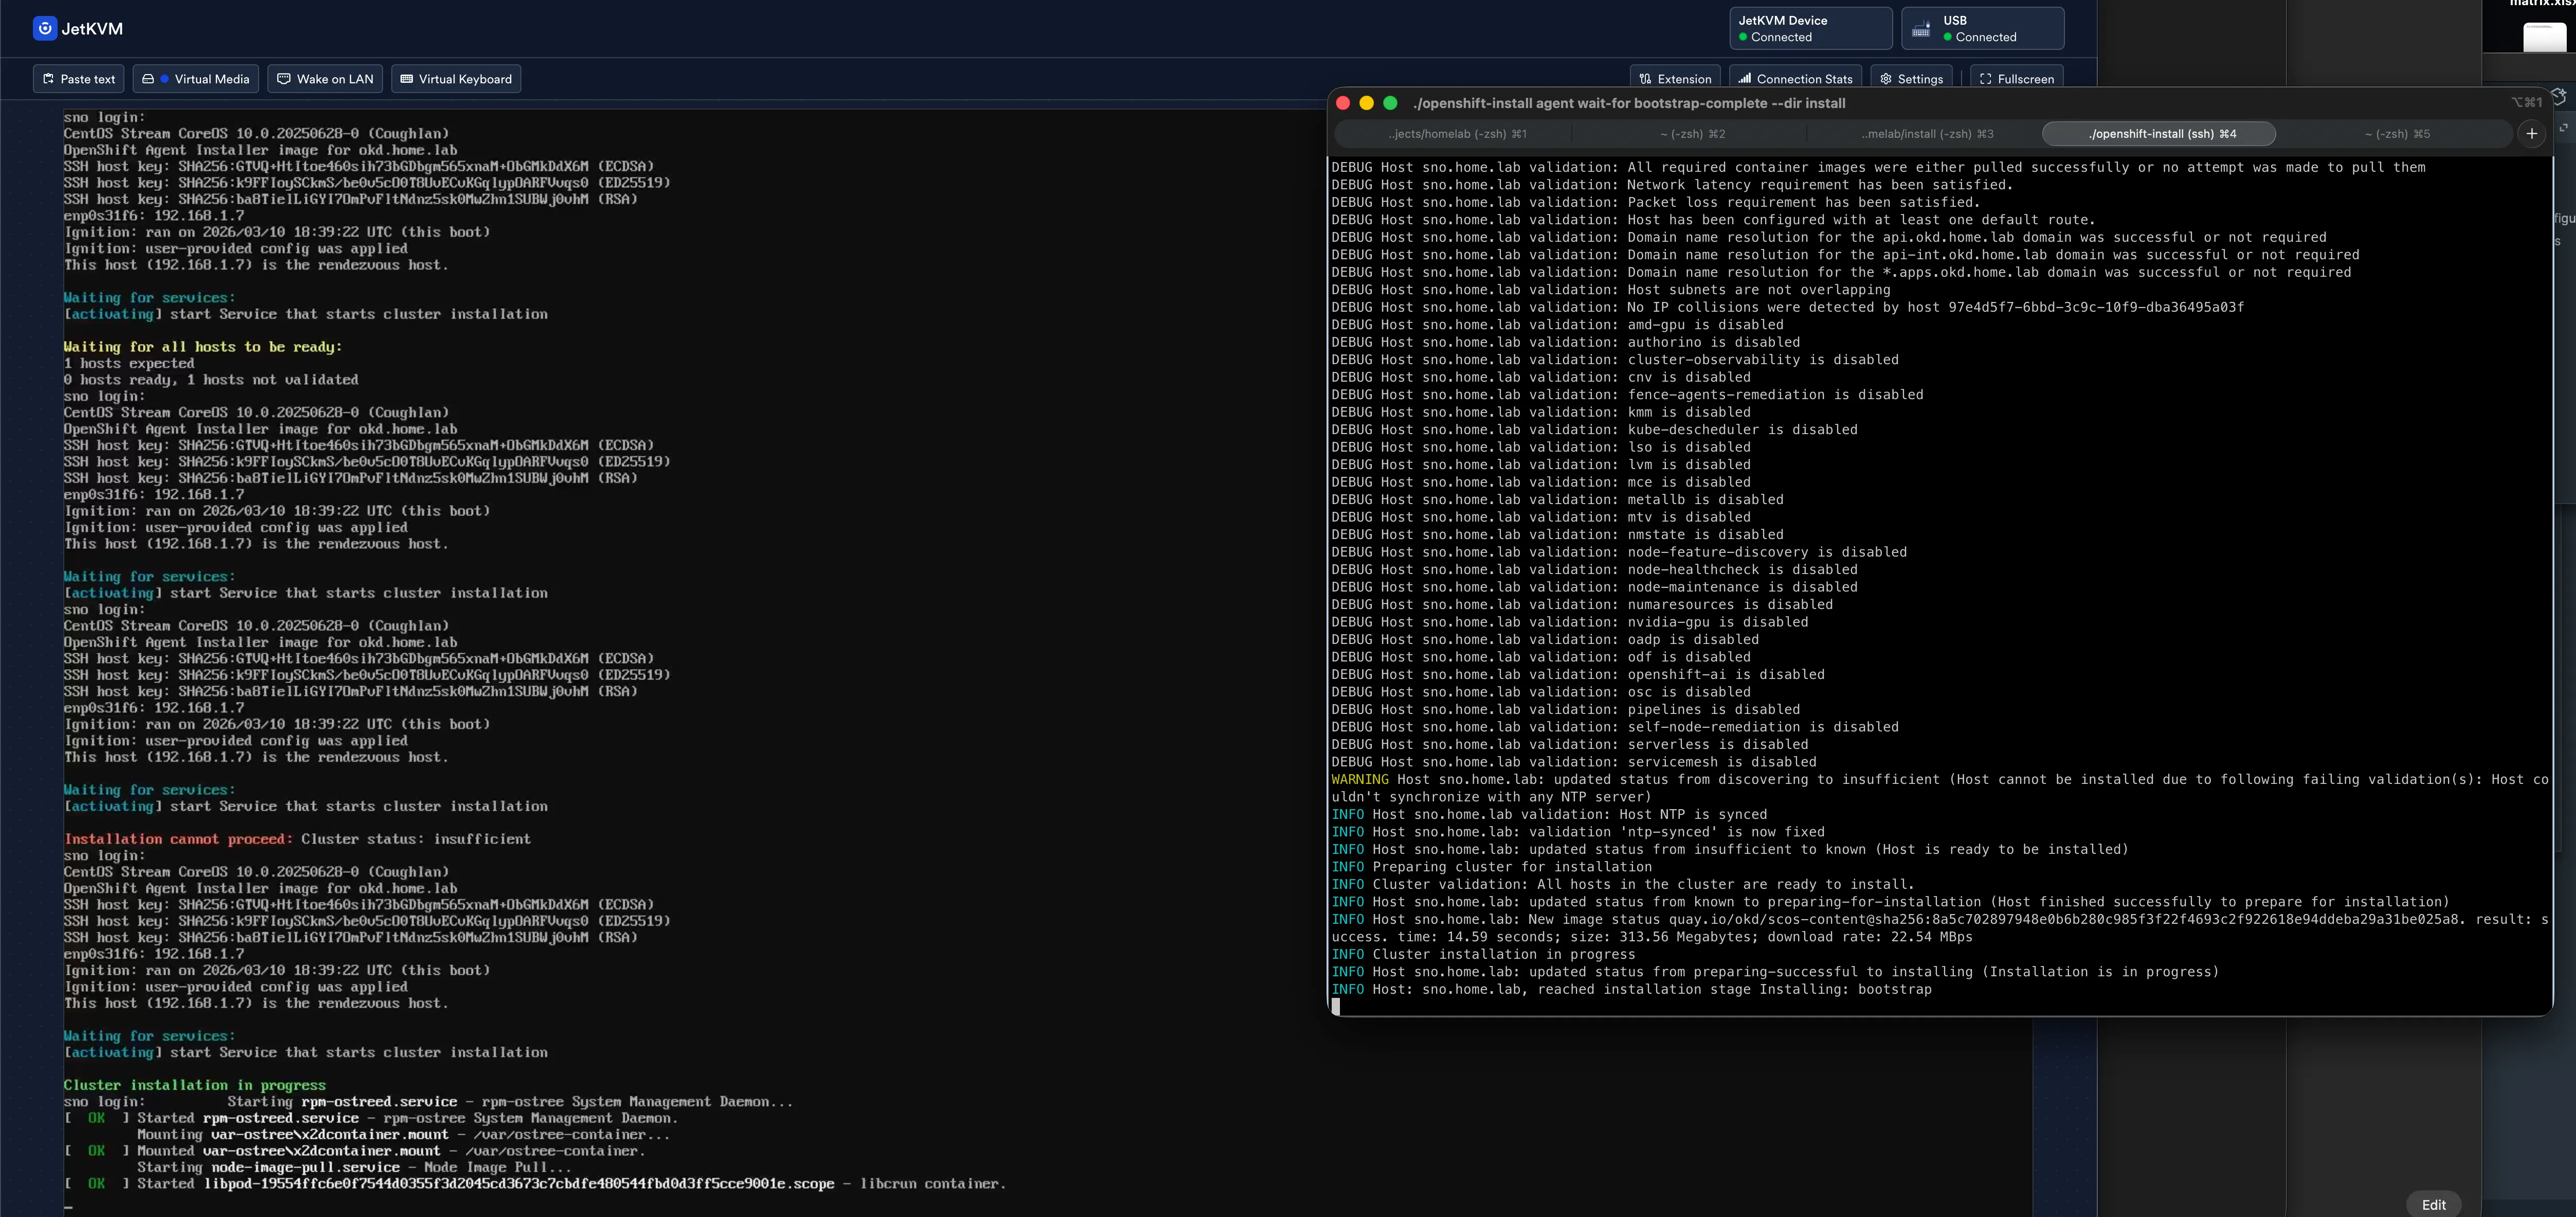
The SCOS image downloads from quay.io at ~24 MB/s (limited by the 1 GbE onboard NIC, not the internet connection):
New image status quay.io/okd/scos-content@sha256:8a5c...result: success. time: 13.37 seconds; size: 313.56 Megabytes; download rate: 24.58 MBpsThen it’s a long wait. The node writes the image to disk, reboots, and bootstraps. The wait-for bootstrap-complete command sits in a loop printing “Bootstrap Kube API never initialized” every 30 seconds for about 30 minutes while the node does its work.
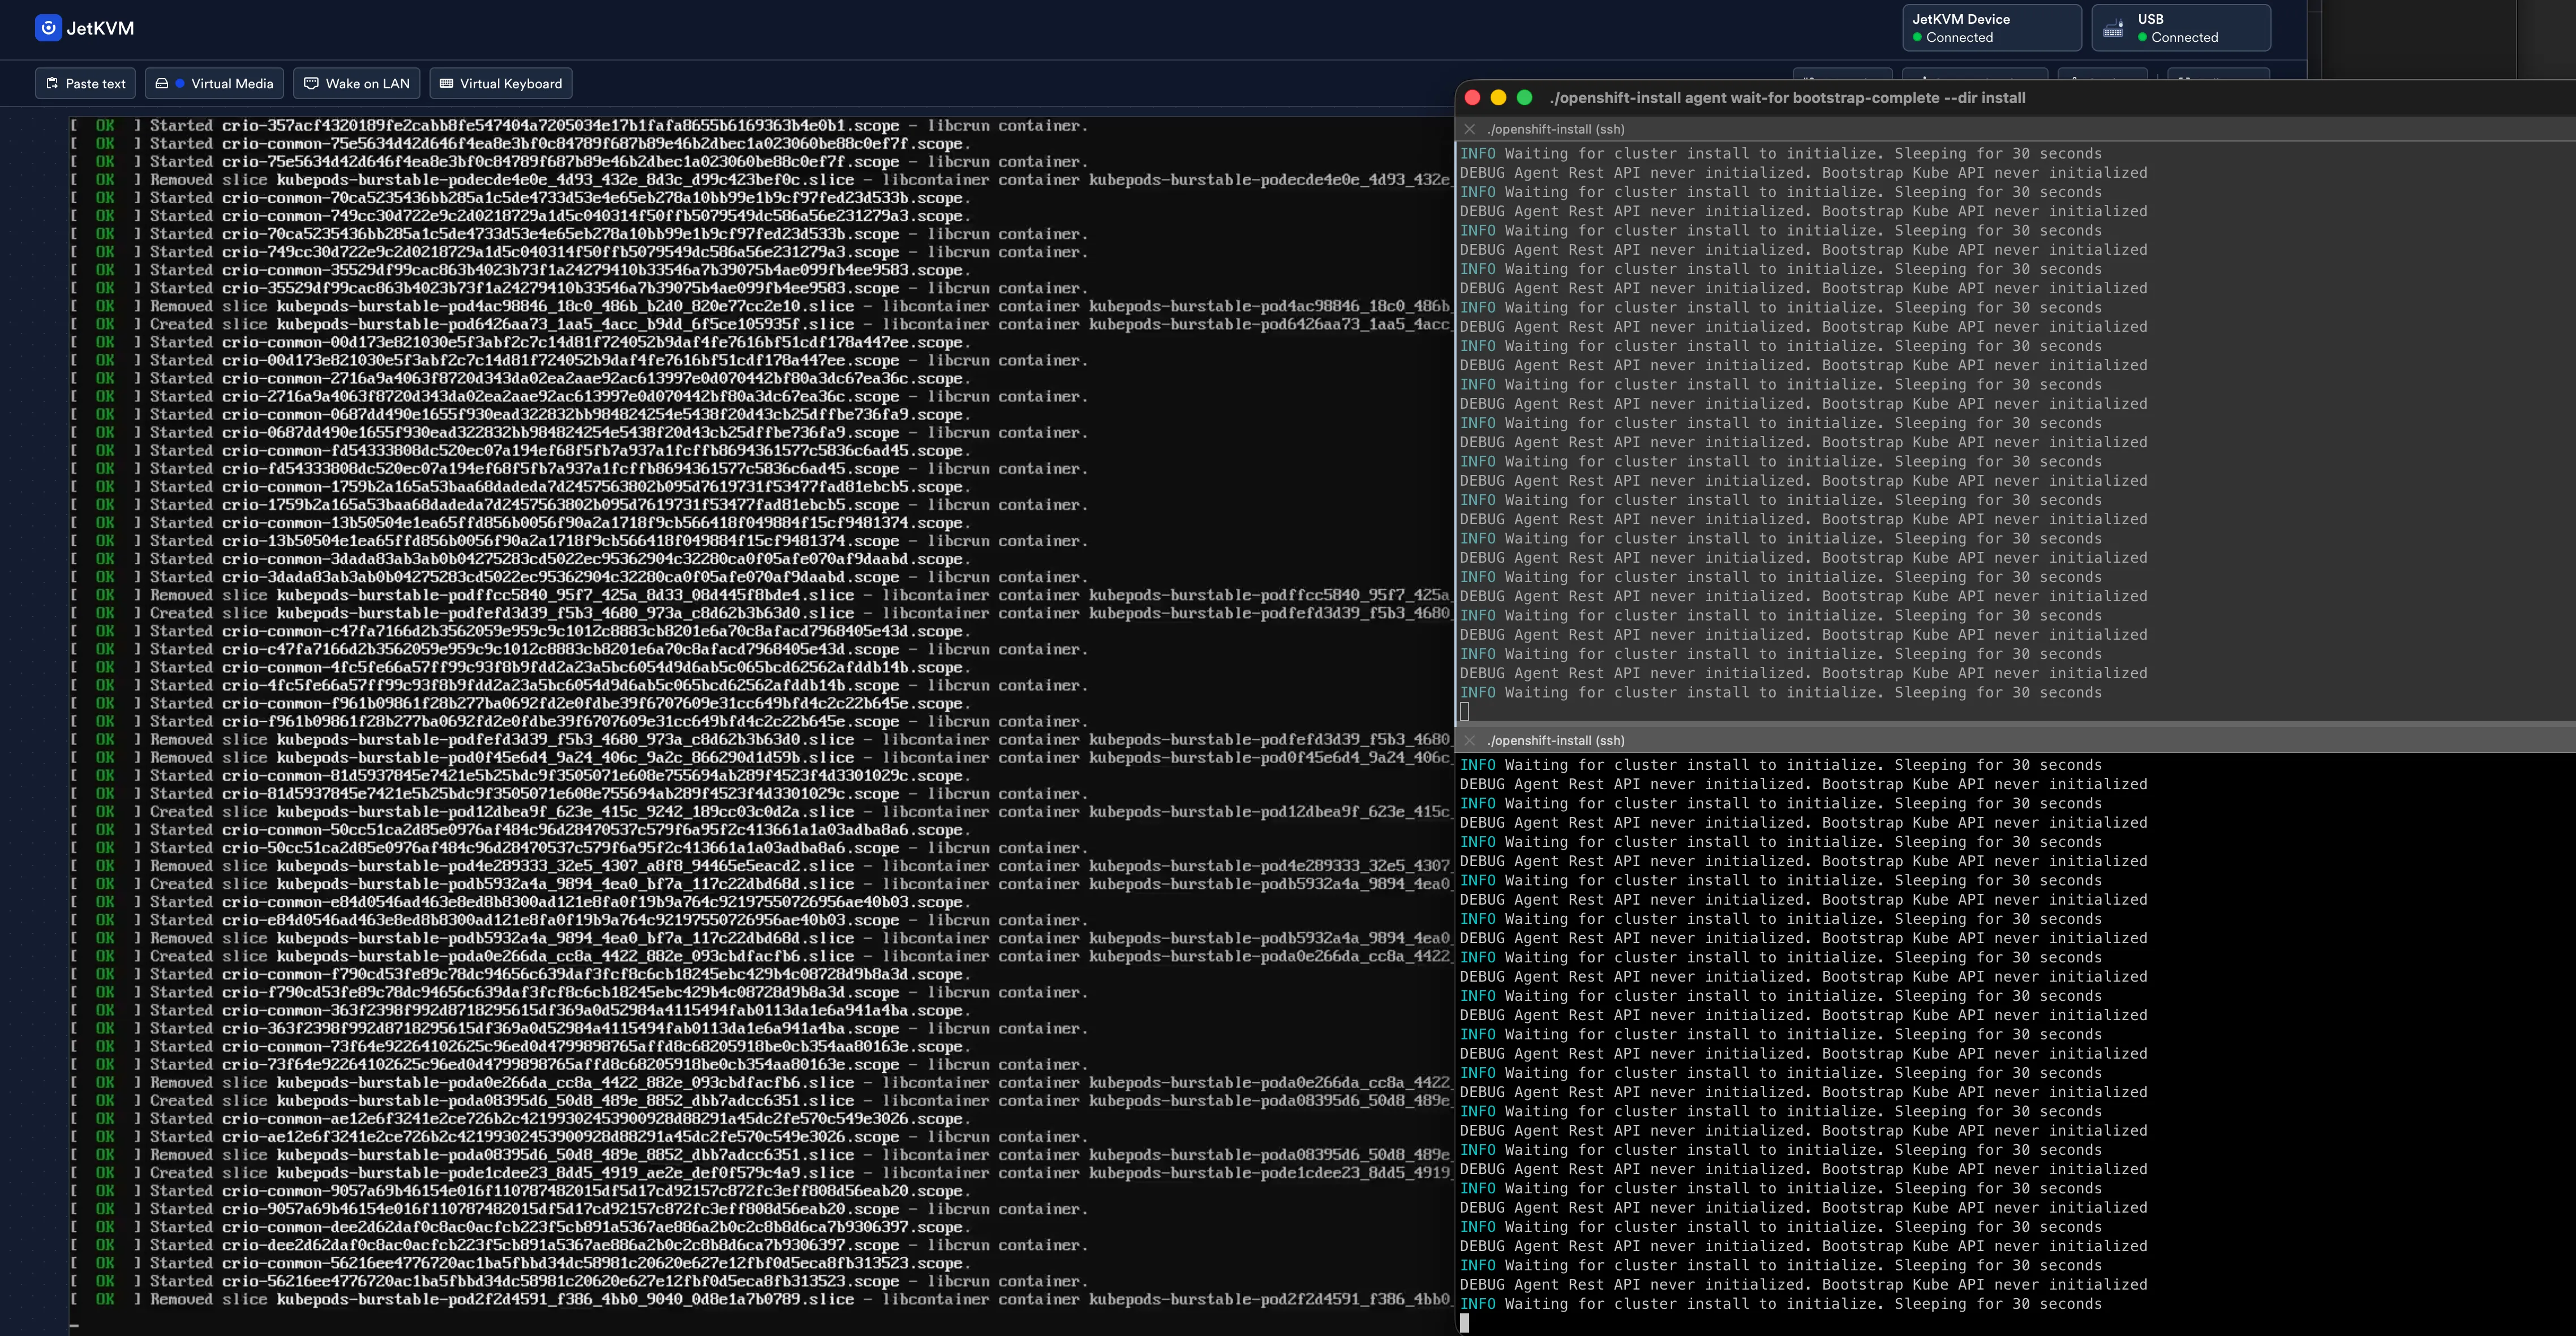
Bootstrap eventually completes:
INFO Bootstrap Kube API InitializedINFO Bootstrap configMap status is completeINFO Bootstrap is completeINFO cluster bootstrap is completeThen wait-for install-complete takes over and watches the 960 manifests get applied. Cluster operators come up one by one — from 0% to 68%, back to 0% (API server restart), back up to 67%, and eventually all the way through.
./openshift-install agent wait-for install-complete --dir install --log-level=debugIn my case, this command timed out after ~70 minutes because the ingress canary check was failing (more on that below). The cluster was functional — the timeout is just the installer giving up on waiting for all operators to report healthy. The error output tells you to troubleshoot and re-run the command:
ERROR Cluster operator ingress is degraded: timed out waiting for the conditionERROR The 'wait-for install-complete' subcommand can then be used to continue the installationConnecting to the cluster
Once bootstrap completes, the cluster is accessible. Two ways in:
Via kubeconfig (CLI):
export KUBECONFIG=install/auth/kubeconfigoc get nodesoc get coVia web console (browser):
# Console URLoc whoami --show-console# https://console-openshift-console.apps.sno.home.lab
# Admin passwordcat install/auth/kubeadmin-password
Open the console URL in a browser, login as kubeadmin with the password from the file. Both methods use the credentials generated during ISO creation — they’re in install/auth/ from the moment you built the ISO.
VIPs and platform: none
The minimal network config from the previous post had OKD VIPs at .253 and .254 on Frontnet. That works for a multi-node cluster where keepalived manages those addresses. For SNO with platform: none, there is no keepalived — the API and ingress bind directly on the node’s actual IP (.7).
DNS records pointing to .253/.254 result in:
ERROR dial tcp 192.168.1.253:6443: connect: no route to hostBecause nothing listens there. The fix: point all DNS at the node IP.
34 operators, zero degraded
After applying the canary hairpin workaround (more on that below), every operator came up clean:
$ oc get coNAME VERSION AVAILABLE PROGRESSING DEGRADEDauthentication 4.20.0-okd-scos.17 True False Falsebaremetal 4.20.0-okd-scos.17 True False Falsecloud-controller-manager 4.20.0-okd-scos.17 True False Falsecloud-credential 4.20.0-okd-scos.17 True False Falsecluster-autoscaler 4.20.0-okd-scos.17 True False Falseconfig-operator 4.20.0-okd-scos.17 True False Falseconsole 4.20.0-okd-scos.17 True False Falsecontrol-plane-machine-set 4.20.0-okd-scos.17 True False Falsecsi-snapshot-controller 4.20.0-okd-scos.17 True False Falsedns 4.20.0-okd-scos.17 True False Falseetcd 4.20.0-okd-scos.17 True False Falseimage-registry 4.20.0-okd-scos.17 True False Falseingress 4.20.0-okd-scos.17 True False Falseinsights 4.20.0-okd-scos.17 True False Falsekube-apiserver 4.20.0-okd-scos.17 True False Falsekube-controller-manager 4.20.0-okd-scos.17 True False Falsekube-scheduler 4.20.0-okd-scos.17 True False Falsekube-storage-version-migrator 4.20.0-okd-scos.17 True False Falsemachine-api 4.20.0-okd-scos.17 True False Falsemachine-approver 4.20.0-okd-scos.17 True False Falsemachine-config 4.20.0-okd-scos.17 True False Falsemarketplace 4.20.0-okd-scos.17 True False Falsemonitoring 4.20.0-okd-scos.17 True False Falsenetwork 4.20.0-okd-scos.17 True False Falsenode-tuning 4.20.0-okd-scos.17 True False Falseolm 4.20.0-okd-scos.17 True False Falseopenshift-apiserver 4.20.0-okd-scos.17 True False Falseopenshift-controller-manager 4.20.0-okd-scos.17 True False Falseopenshift-samples 4.20.0-okd-scos.17 True False Falseoperator-lifecycle-manager 4.20.0-okd-scos.17 True False Falseoperator-lifecycle-manager-catalog 4.20.0-okd-scos.17 True False Falseoperator-lifecycle-manager-packageserver 4.20.0-okd-scos.17 True False Falseservice-ca 4.20.0-okd-scos.17 True False Falsestorage 4.20.0-okd-scos.17 True False FalseAll 34 Available, all False on Degraded and Progressing. The cluster is running on SCOS 10 (kernel 6.12.x) with Kubernetes 1.33.5 and CRI-O 1.33.4:
$ oc get no -o wideNAME STATUS ROLES VERSION OS-IMAGEsno.home.lab Ready control-plane,master,worker v1.33.5 CentOS Stream CoreOS 10.0.20251023-0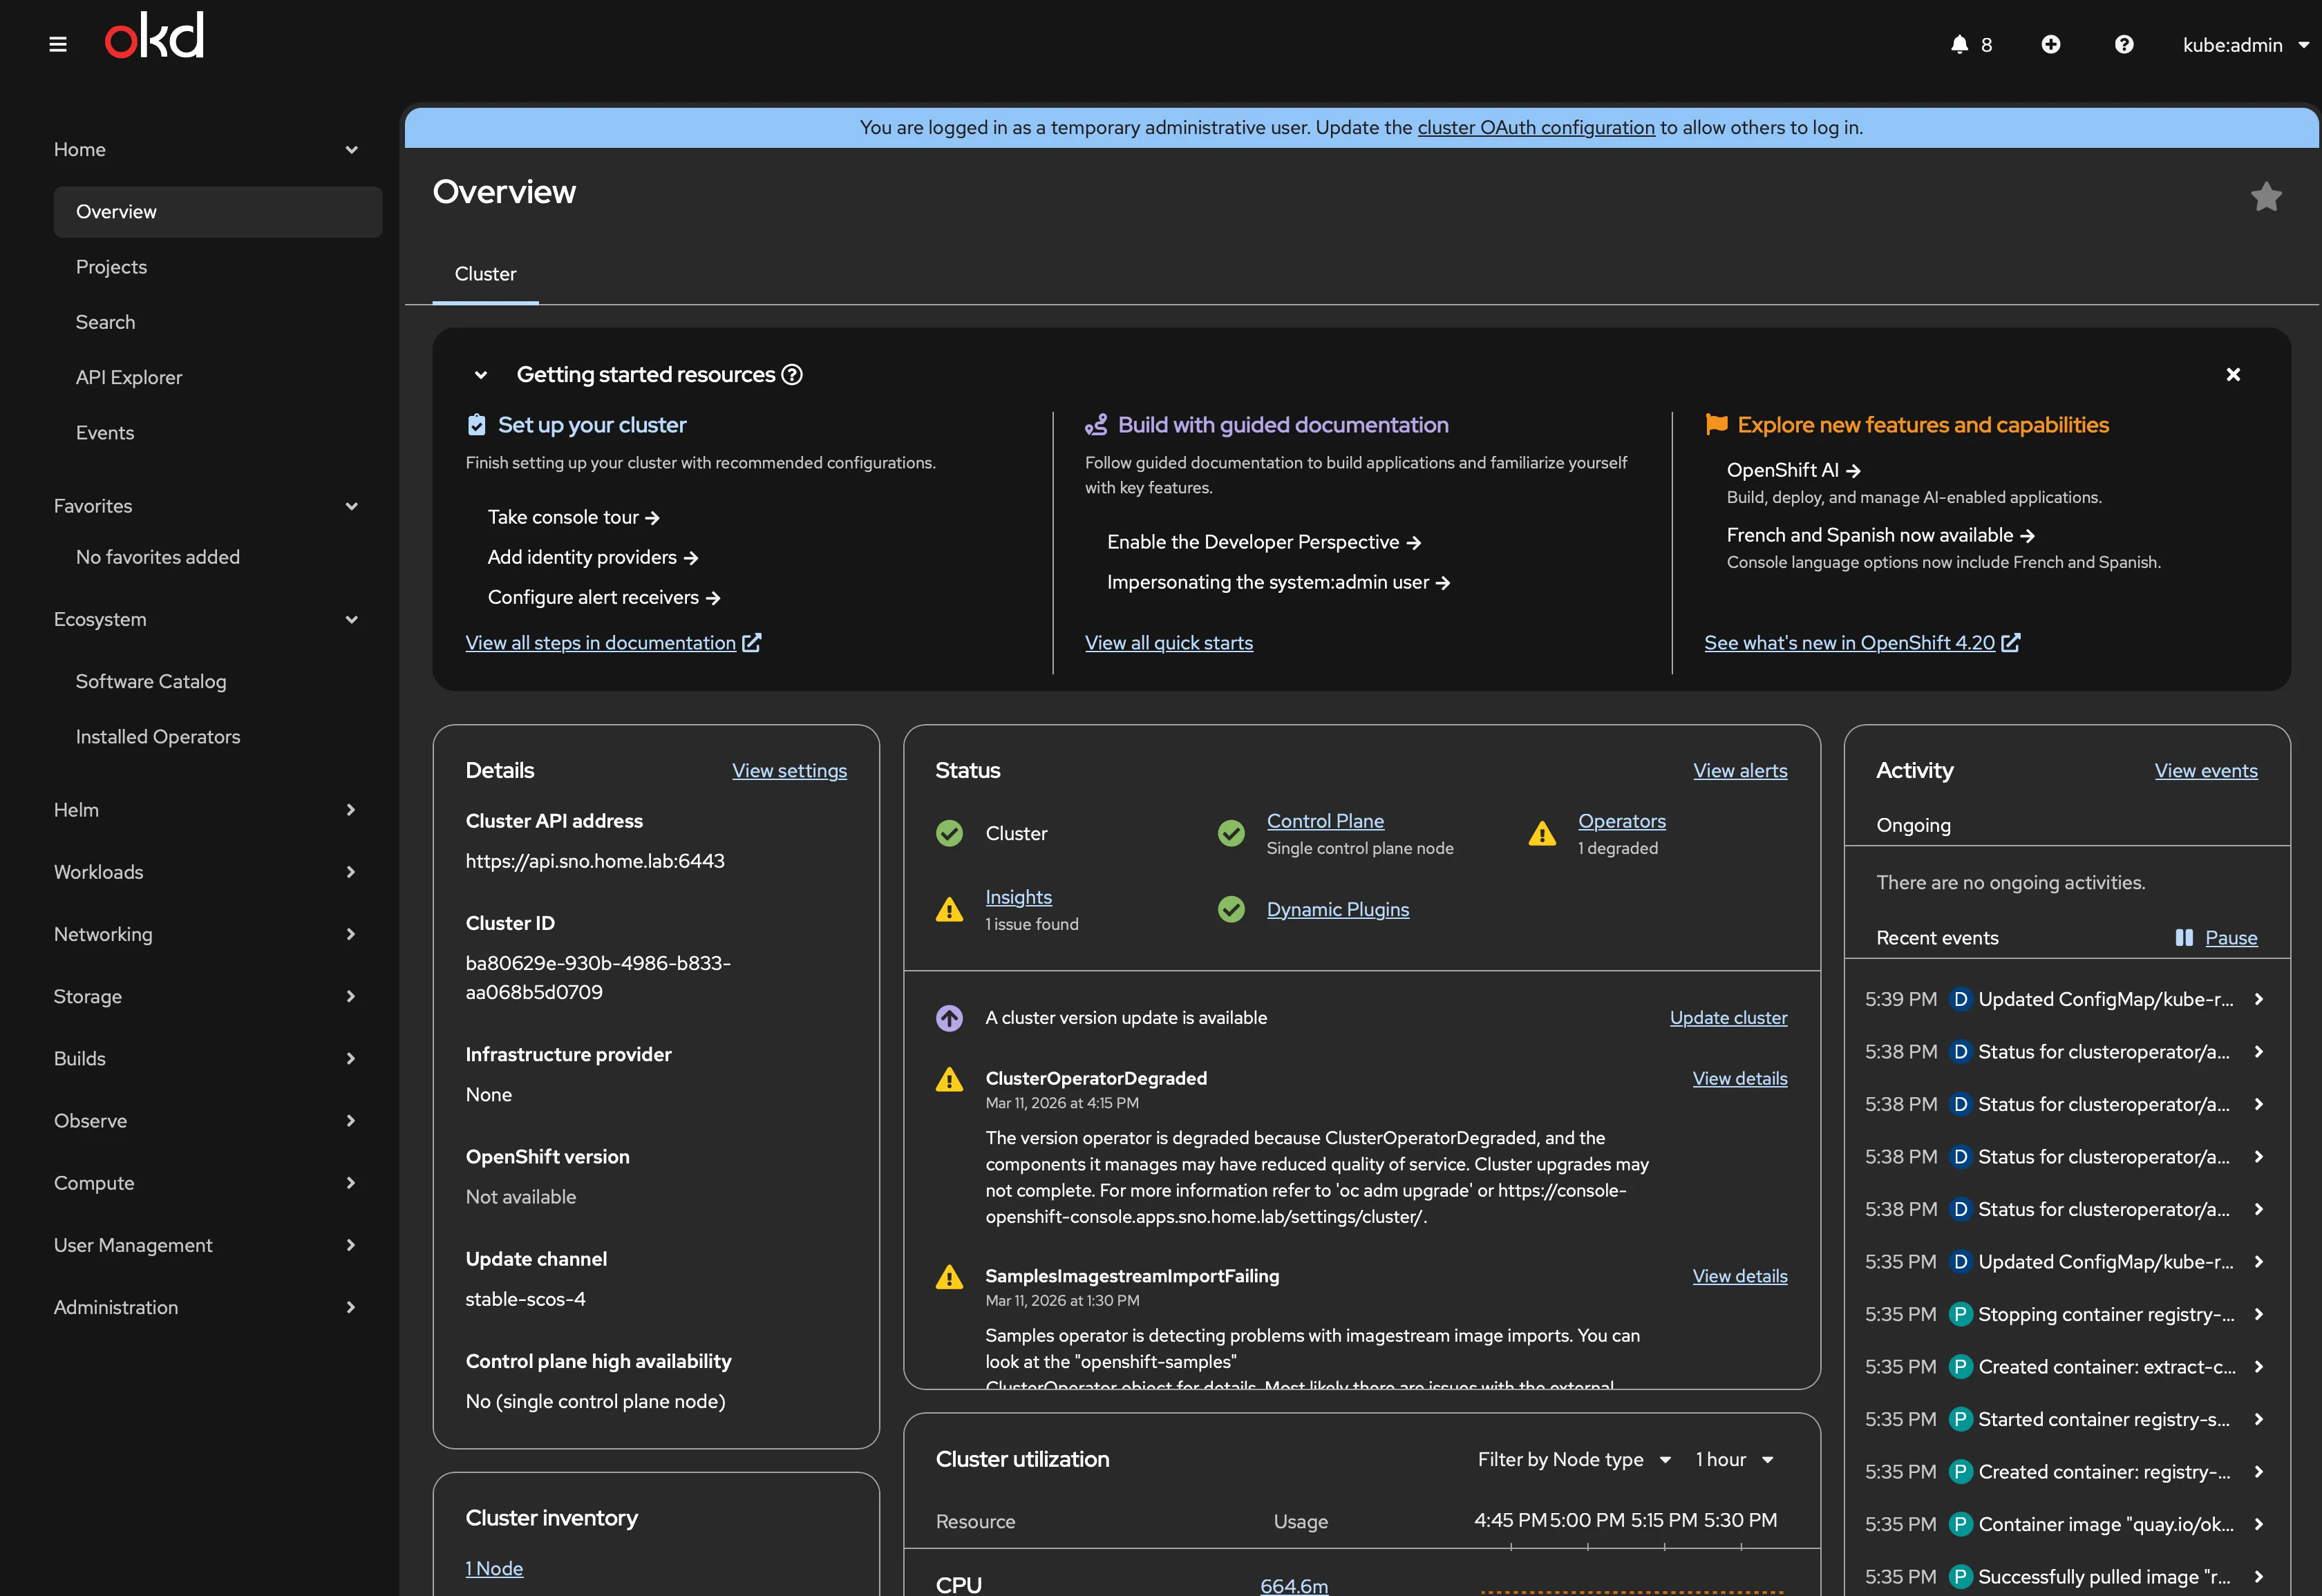
The ingress canary hairpin problem
The one operator that didn’t come up clean initially was ingress. The canary health check — which tests that the ingress router can serve traffic — times out because the node can’t reach its own external IP (192.168.1.7) through OVN.
Traffic via 127.0.0.1 works fine. Traffic via the external IP does not. The canary route resolves to the external IP, so the health check fails.
Workaround:
sudo bash -c 'echo "127.0.0.1 canary-openshift-ingress-canary.apps.sno.home.lab" >> /etc/hosts'This is cosmetic — all actual ingress routing works correctly. The console, OAuth, monitoring routes are all accessible from external clients. Only the self-test fails. The /etc/hosts entry doesn’t persist across reboots on SCOS, but for SNO validation purposes it’s sufficient.
Monitoring and etcd health
Prometheus has 69 active scrape targets. The monitoring stack is fully operational:
$ oc get pods -n openshift-monitoringalertmanager-main-0 6/6 Runningcluster-monitoring-operator 1/1 Runningkube-state-metrics 3/3 Runningprometheus-k8s-0 6/6 Runningprometheus-operator 2/2 Runningprometheus-operator-admission-webhook 1/1 Runningmetrics-server 1/1 Runningmonitoring-plugin 1/1 Runningnode-exporter 2/2 Runningopenshift-state-metrics 3/3 Runningtelemeter-client 3/3 Runningthanos-querier 6/6 Runningetcd reports healthy with a 3 ms commit latency:
$ etcdctl endpoint health --clusterhttps://192.168.1.7:2379 is healthy: successfully committed proposal: took = 3.236162msA handful of apply request took too long warnings appear in the etcd logs — all read-only range operations at 200–255 ms, clustered around two timestamps during operator reconciliation. No slow fdatasync warnings, which is what you’d worry about on a boot SSD. The Intel D3-S3610 (MLC) is handling etcd’s write patterns comfortably.
Backnet (VLAN 10) storage path validation
The CX4121C Mellanox NIC has been sitting idle during the install — only the onboard Intel 1 GbE NIC was configured for OKD. Now I validate the storage network path that Ceph will use in Phase 1.
$ ssh core@192.168.1.7$ ip -br link | grep -v -E "lo|ovs|br|veth|eno|enp0"enp1s0f0np0 UP ec:0d:9a:75:a5:d8enp1s0f1np1 DOWN ec:0d:9a:75:a5:d9Two ports visible, mlx5_core driver loaded. Port 1 is UP (DAC connected to CRS317), port 2 is DOWN (no cable for SNO — second port is for LACP bonding in Phase 1).
Assign a temporary IP and test the path through the switch to the router:
$ sudo ip addr add 192.168.10.2/24 dev enp1s0f0np0$ sudo ethtool enp1s0f0np0 | grep -E "Speed|Link" Speed: 10000Mb/s Link detected: yes
$ ping -c 5 -I enp1s0f0np0 192.168.10.1PING 192.168.10.1 (192.168.10.1) from 192.168.10.2 enp1s0f0np0: 56(84) bytes of data.64 bytes from 192.168.10.1: icmp_seq=1 ttl=64 time=0.153 ms64 bytes from 192.168.10.1: icmp_seq=2 ttl=64 time=0.118 ms64 bytes from 192.168.10.1: icmp_seq=3 ttl=64 time=0.084 ms64 bytes from 192.168.10.1: icmp_seq=4 ttl=64 time=0.122 ms64 bytes from 192.168.10.1: icmp_seq=5 ttl=64 time=0.109 ms
--- 192.168.10.1 ping statistics ---5 packets transmitted, 5 received, 0% packet loss, time 4122msrtt min/avg/max/mdev = 0.084/0.117/0.153/0.022 ms10 Gbps link, sub-millisecond latency, zero packet loss. The full L2/L3 path works: CX4121C → DAC → CRS317 sfp-sfpplus2 (VLAN 10 access port) → trunk to CCR2004 → VLAN 10 gateway (192.168.10.1).
This is the path Ceph replication traffic will use in Phase 1. It works.
Lessons learned
Every one of these cost time during the install:
-
The podman-based assisted-service is dead for OKD 4.20. Don’t follow the
github.com/openshift/assisted-service/deploy/podmanguide. It pulls OCP-aligned images that don’t work with OKD. The agent-based installer (openshift-install agent create image) is the only supported method. -
openshift-install is Linux x86_64 only. No macOS support. Apple Silicon Macs running podman with
--platform linux/amd64stall on QEMU emulation. Build the ISO from any Linux x86_64 machine — even an old node with a Fedora container. -
nmstatectl is required and Fedora/RHEL only. Not on macOS, not on Ubuntu. A Fedora container solves this cleanly.
-
Interface names must match exactly in agent-config.yaml. The Dell OptiPlex 5090 SFF onboard NIC is
enp0s31f6. If your route config saysenp1s0, NMState validation fails and no ISO is generated. -
metadata.name = DNS prefix. If the YAML says
sno, DNS must haveapi.sno.home.lab. No exceptions. Two hours of my life learned this. -
Pi-hole doesn’t forward to the router by default. It goes straight to OpenDNS. Add conditional forwarding for your
home.labzone. If AWS can go down over DNS, your homelab will too. -
platform: none means no VIPs. No keepalived, no haproxy. Everything binds on the node IP. DNS must point at
.7, not at.253/.254. -
Use the admin kubeconfig, not the node kubeconfig. The file at
/etc/kubernetes/kubeconfigon the node is thenode-bootstrapperservice account. It can’t list cluster operators. -
RouterOS wildcard DNS needs address= type, not FWD. The FWD record type forwards to another DNS server. For local wildcard resolution, use a regex record with
address=. -
The ingress canary hairpin is cosmetic. The node can’t reach its own external IP through OVN. A
/etc/hostsentry pointing the canary hostname to127.0.0.1clears the degradation. All real ingress works.
Result: GO for Phase 1
All validation criteria pass:
| # | Criterion | Result |
|---|---|---|
| 1 | Cluster version 4.20.0-okd-scos.17, Available, not Progressing | PASS |
| 2 | Node Ready, roles correct | PASS |
| 3 | All 34 operators Available, not Degraded | PASS (ingress canary workaround) |
| 4 | No unexpected failing pods | PASS |
| 5 | Web console accessible, kubeadmin login works | PASS |
| 6 | Monitoring stack operational (69 Prometheus targets) | PASS |
| 7 | etcd healthy, no slow fdatasync warnings | PASS |
| 8 | Backnet VLAN 10 path validated (10 Gbps, 0.117 ms avg) | PASS |
The single-node cluster is healthy. The hardware runs OKD without issues. etcd is comfortable on the MLC boot SSD. The storage network works end-to-end.
Time to order Nodes 5 and 6.
What’s next
This SNO gets wiped. Node 4 becomes the first member of a 3-node cluster in Phase 1. Before that:
- Revert DNS from
sno.home.labtookd.home.labwith VIP addresses - Run hardware validation on each new node
- Configure LACP bonds on the CRS317 for dual-port storage networking
- Enable jumbo frames (MTU 9000) after bonds are stable
- Deploy Phase 1: 3-node OKD with Rook-Ceph distributed storage